Necessity is often the mother of invention. When I first moved back from Columbus to Akron in late 2004, I quickly discovered a lack of good gnocchi in local restaurants and supermarkets. Now, that's not to say it didn't exist, but I didn't have the connections or knowledge to successfully seek it out. Having gotten hooked on the gnocchi served at Monte Carlo Italian Restaurant in Columbus during my five year stay, I knew that I couldn't subsist on the heavy, dense, sit-at-the-bottom-of-my-stomach variety that were available in the area. Thus, I decided to teach myself how to make it from scratch.
Homemade pasta scares a LOT of people. And to be honest, I think I was fairly intimidated by it as well. I had seen it made many times on television, and in theory, it looked simple enough. Depending on the type of pasta one was making, the basics were flour, eggs, sometimes oil, sometime water, and salt. One day, fed up with what was available and craving good gnocchi, I searched around the Internet for several recipes. Over the years, I have honed in on a single recipe that has served me well.
Gnocchi, at its most basic, is an Italian potato-based pasta. It isn't like pierogi, which are a pasta-like dough dough filled with potatoes (much like ravioli). Rather, the potato is actually in the dough itself, no filling necessary. Good gnocchi are ethereally light, almost pillow like. Bad gnocchi ... well, I've already described those to you, so I won't belabor the point. I suppose somehow along the way I've learned to channel a little old Italian grandmother inside of me when I am rolling out the dough, cutting the individual gnocchi and rolling them off the back of a fork to create the ribbed texture.
The recipe for gnocchi is almost stupid simple. In fact, let's get that out of the way right now.
Potato Gnocchi
2 pounds Idaho potatoes, peeled, boiled, and mashed
2 cups of All-Purpose flour, plus additional for kneading
1 egg
Salt and pepper to taste
You can really use any starchy potato for gnocchi, but I would avoid waxy potatoes, such as New or Fingerling, as they tend not to give you the creamy texture you are after. Also, I would stick with All-Purpose flour instead of stronger bread flour. You want the gnocchi to be ultra-tender and using bread flour could create a tougher pasta because of the higher protein content. For a single recipe, I generally don't measure the salt too closely, but if I were pressed to give a measurement, it would probably be a tablespoon of kosher (or coarse) salt. That may seem like a lot, but remember, you are making several pounds of pasta. To be fair, if I salt the dough, I tend not to salt the water in which I cook them.
The first step is to prepare the potatoes. For those really green in the kitchen, I will give a quick primer. First, peel the potatoes. Then cut the potatoes into thirds or quarters so that they cook more quickly. Just make sure to cut all of the potatoes into the same size pieces so that they cook evenly. Fill the pot with COLD water to cover the potatoes by at least an inch or two. Then place on stove and turn the burner on high until the water just starts to boil. Turn the stove down so that the potatoes cook in gently boiling water until a sharp knife easily goes in and comes out of the potato wedges. Drain the water in a colander, return the potatoes to the still hot pan and pull out your potato masher. Without adding anything additional (like milk and butter for regular mashed potatoes), mash away until they are smooth.
The great news is that you can do this step ahead of time (up to one day ahead). If you want to store them for later, place them in a container and place a piece of plastic wrap so that it touches the mashed potatoes before placing a lid on the container. This prevents the outer surface from drying out. Refrigerate until about thirty minutes before you need the potatoes. At that point, remove the container from the refrigerator and set it on the counter to take the chill off. Note that while you will start with two pounds of raw, unpeeled potatoes, after peeling, cooking, and mashing, you will end up with closer to a pound-and-a-half of finished potatoes.
To make the pasta, place the flour in a mound on your work surface. Using a fork, lightly scramble the egg in a small bowl. Using your finger, make a circular motion in the very center of the flour to create a well. Dump the egg into this well, along with the salt and the freshly ground pepper. Using the fork, slowly start to mix the flour from the edges of the well into the liquid egg, being careful not to break through the walls of the well. When enough flour gets mixed into the egg, it will thicken considerably and lose its "runniness." At this point, you can set the fork down and pick up the second most handy tool in the kitchen, the bench scraper. This tool is invaluable for making breads and pastas and at only a couple of dollars, is a multi-tasker that is an excellent investment.
The next step is to add the potatoes to the top of the flour/egg mound. I will tell you that at this point, you will be thinking to yourself, "What in the hell kind of a mess is this?" Trust me, it will all come together with a little love and time. Take the potato out of the container in chunks and run it through your fingers to break it up. If the mashed potatoes are freshly made (you did let them come down to room temperature, right?), you won't need to break them up. It will look like a LOT of potatoes compares to the amount of flour, but that is what makes the resulting gnocchi so tender.
Once the potatoes are on top of the flour, start using the bench scraper to lift and fold the mound onto itself over and over again, pressing down as you fold it over, compacting the dough. Every now and again, you can use the bench scraper to separate the dough from the work surface and simply rotate it or flip it over entirely. Continue doing this for a good five minutes or so, resisting the urge during this time to add more water or flour. The flour is being hydrated during this period and needs a few minutes of adjustment time before you can accurately tell how much adjustment it will need.
Once the dough is holding together (even if there are still visible areas of potato), switch to the best tool in the kitchen: your hands. Begin kneading the dough, using the bench scraper to separate the dough from the work surface as necessary. It is at this stage of the process that you will need to make the judgement call of adding either more flour or a little bit of water. The finished dough should be tacky, but not sticky. In the end, from start to end, it probably takes about ten minutes to make the pasta dough.
Once the dough looks and feels right, you will need to give it time for the gluten that has been activated in the flour to rest and relax. If you are going to roll out the gnocchi right away, mound the dough into a round and cover it with a damp towel or a piece of plastic and let it sit for at least twenty minutes. You could also put the dough into a covered container and refrigerate it overnight. Just make sure that if you refrigerate it, take it out about thirty minutes before you want to roll it to take the chill off the dough.
So, gentle reader, now we've made the dough. Let's take it one step further and make gnocchi.
Using your bench scraper, cut off a hunk of the dough, maybe about 1/2-3/4" thick. Have bench flour available for your work surface in case the dough is still a little sticky, but remember, the less flour used, the more tender the pasta will be, so it's always a balancing act. With the hunk of dough, use your fingertips to roll the dough into a long snake. The length of the snake will depend on how big your hunk of dough started at, but you generally want the cylinder (the snake) to be a thicker than a Tootsie Roll.
With your snake rolled out, use a small knife or the bench scraper (man that thing's gettin' a lot of use, no?) to begin moving from one end to the other cutting out the individual gnocchi, maybe 1/2-3/4" wide. You generally want the width to be less than the width of a fork. Once you've cut the entire snake, the final step is to give each pasta piece their characteristic ridges. Using the backside of a fork, take a single gnocchi and using the thumb of your non-fork-wielding hand, press and roll the dough against the fork. Do this for every dough piece that you cut.
Place the finished gnocchi on a parchment-lined 1/2 sheet pan (or cookie tray), making sure that the gnocchi don't touch each other. Now, simply cut another hunk of pasta dough from the mound and repeat the process until you've run out of dough. Typically, one batch of gnocchi dough will fill about 1 1/2 sheet pans (of the 1/2 sheet variety). If you are going to use the finished gnocchi immediately, now would be a good time to put a large pot of water on the stove to boil. Your other option is to freeze the gnocchi on the sheet pan. Once they are rock hard, scrape the gnocchi off the parchment and put them into a freezer bag. They'll keep in the freezer for quite some time, although they've never been in my freezer for more than a month.
Once the water has come to a boil, if you salted the dough, do not salt the water, too. If you didn't salt the dough, add a couple of tablespoons of kosher salt (or half as much table salt). Working quickly, add about half of the gnocchi to the pot of water and stir gently to make sure they aren't sticking to the bottom or each other. If you have previously frozen the gnocchi, add them straight from the freezer; do not defrost first. When the gnocchi start floating to the top of the pot, you know they are very close to being done. Fresh gnocchi will take just a few minutes to float and add another minute or two if you are boiling them from frozen.
One note about boiling the pasta. While it's okay to bring the water to a hard boil before adding the pasta, once the pasta is added and comes back to the boil, adjust the heat level so that it cooks the gnocchi on a gentle boil. Continued hard boiling of the pasta can cause it to break up. Also, make sure to gently stir the gnocchi while they are cooking.
Once the gnocchi is cooked, use a slotted spoon or a strainer to remove them from the boiling water. Depending on how you will be serving them, you can add them straight to a pan of sauce or you can place them into a bowl with just a touch (and I do mean just a touch) of oil to coat them so that they won't stick together. If you have additional gnocchi to cook, continue to do so in batches until they are all finished.
While I love gnocchi that have been finished in a bit of brown butter and sage, you could also do a simple tomato sauce, a spicier puttanesca sauce, or do what I did today at the market demonstration today, and finish the gnocchi in a saute pan with some freshly chopped garlic, pre-rendered bacon, and a tender green of some kind, like spinach, Swiss chard, or kale.
To a heated saute pan, add a bit of oil (I use grapeseed oil, but you could also use a neutral oil like Canola or light olive) and, if you remembered to keep it while cooking the bacon, some of the rendered bacon fat. When the oil is hot, add about a tablespoon of chopped garlic and cook for a minute or so until you smell the garlic and it gets just a hint of color to it. Add your gnocchi to the saute pan and stir (or flip the contents if you know how) to coat the gnocchi in the garlic and oil. In addition to adding flavor to the gnocchi, sauteeing it for a few minutes allows you to add some crispy outer texture to it as well.
If you prefer a little bit of spice to your dish, add just a smidgeon of crushed red pepper to the pan. Not so much that it makes the dish spicy, but just enough so that it gives character to the finished dish. Next, add some of the crumbled bacon. Stir/toss to combine. Finally, add a large handful of fresh greens, and about 1/4 cup of the pasta cooking water to the pan. Quickly cover the pan with the lid and allow the greens to steam for about forty-five seconds. Remove the lid and toss the pasta one final time before tasting it to make sure it has enough salt and pepper. Adjust accordingly.
To serve, either plate on a family-style platter or in individual servings in a bowl. Sprinkle freshly grated Parmesan or Romano cheese on top and serve. This recipe would probably make 8-10 servings as an appetizer, or 4-5 servings as the pasta course.
While I will be the first to admit that making homemade gnocchi can be a time-consuming task, because you can break it down into bite-sized pieces (please pardon the expression), you can make it when you have time and freeze it and when you are ready to serve it for dinner, you need to do no more work than walk to your freezer and retrieve it. At the Howe Meadow Farmers Market where I made this exact dish yesterday for market goers, I made two batches of dough (though to be fair, I made the mashed potatoes the night before) and cooked it in three batches for tasters in roughly two hours. That included mixing the dough, rolling it, cutting it, cooking it and serving it.
And, in one of the best compliments I received all day during my demo, when I told a woman who had approached my tent what I was making, she looked apprehensive and said that while she has tried gnocchi many times, none had ever come close to her Italian Nonna. She watched as I finished the boiled gnocchi in the saute pan and spooned a portion into the small paper cup that the market had provided for me. I handed it to her and watched her expression as she tasted one and then a second of the small hot potato dumplings.
"In all the years I've been eating gnocchi, none has ever lived up to my Nonna's until now. Yours is as good as hers."
High praise, indeed! I hope you give this recipe a try for yourself. Once you learn the basics, it is quite easy to do and the results are really worth it. Even cooked from frozen, this gnocchi blows away anything you could purchase in a local supermarket.

Showing posts with label howe meadow market. Show all posts
Showing posts with label howe meadow market. Show all posts
Sunday, July 31, 2011


Sunday, November 7, 2010
Kitchen Challenge: Warm Sweet Potato Salad
I make no bones about it: The sweet potato salad at Fat Casual BBQ is magnificent. With its combination of creamy and tender sweet potatoes, the fabulousness from the smoky bacon, and the amazingly tart dressing, I've said it before and I will say it again ... they really have a winner! Done in the style of a traditional warm German potato salad, I decided a few weeks ago to try my hand at making something similar, but with my own twist. I chose not to document my previous attempt because I was simply playing around in the kitchen, unsure of the final result. However, it turned out so well that I decided to recreate it today in order to serve it with dinner tonight for my grandmother and myself.


I then drained the potatoes and kept them aside in a large mixing bowl. At the same time that the potatoes were cooking, I started to cook the bacon in a large saute pan which had been pre-heating over a medium heat. The point of cooking the bacon was not only to get it crispy, but also to render out all of that wonderful bacon fat that I would use for the bacon vinaigrette.


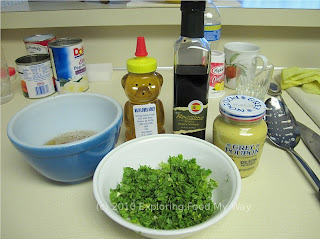
I next turned my attention to the warm bacon dressing. Here were the ingredients necessary (except for the chervil ... somehow that managed to get in the shot, too):
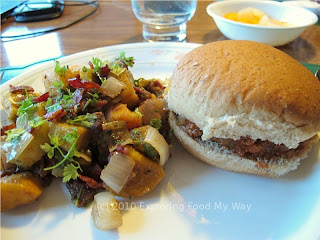
Tonight we paired the warm sweet potato salad with some homemade Sloppy Joes (or, as my friend Judy suggested, Untidy Josephs) and a nice cup of mixed fruit:

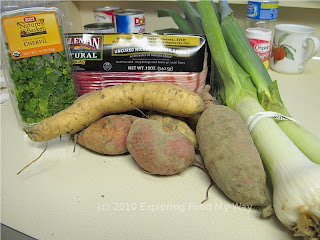
Being that today was the last outdoor market for the Howe Meadow Farmers Market (don't worry, the indoor market starts in just two weeks), I was curious to see what I could scrounge up from the vendors today. After my customary stop at Humble Pie Baking Company for my Ohio pumpkin pie (I'm getting a start on Thanksgiving early this year), I asked proprietor and friend Diane Sikorski if anyone at the market today was selling sweet potatoes. She directed me a few tents down where I found an abundance of multi-hued tubers just waiting to be bagged up. I also looked for onions, another of the few primary ingredients in the salad, but alas, I found none. Fortunately, on my way out, I spotted some gorgeous looking leeks and decided to substitute one for the other since they have such a similar taste.
I then stopped at the Giant Eagle supermarket closest to my grandmother's condominium to pick up the final few ingredients: bacon and fresh tarragon. Fortunately, Giant Eagle has started carrying nitrate-free bacon, so I picked up a 12 ounce package of that (you could certainly use regular bacon, too, but be aware that it usually comes in 16 ounce packages). While there was a single lone box of fresh tarragon in the herb section, it looked absolutely pathetic; "fresh" was not an adjective I would've used to describe it. As it turned out, just below the box of tarragon were plenty of boxes of fresh chervil (which has a similar anise flavor). After a quick search for the freshest looking box, I was out the door and back at grandma's, unpacking my goodies.
Here were the basic ingredients for the salad:

For the salad, I needed:
2 pounds of sweet potatoes (or yams)
1 large onion (or 2 good sized leeks, cleaned), diced
12 ounces bacon
1 package fresh tarragon (or chervil), chopped
Warm bacon dressing
Salt and freshly ground pepper to taste
To prep the sweet potatoes, I simply peeled them with a vegetable peeler and cut them into bite-sized pieces. I attempted to make them all a similar size so that they would finish cooking at the same time. For the bacon, I stuck the entire package in the freezer for about ten minutes to firm up the meat. This allowed me to quickly and easily slice across the strips without the bacon fat fighting with the knife:

I placed the sweet potatoes into a pot of salted boiling water, turned it down to a simmer and cooked them until a paring knife could be inserted and removed easily. I made sure to keep the water at a gentle simmer so that the potatoes didn't break up as they cooked.

I then drained the potatoes and kept them aside in a large mixing bowl. At the same time that the potatoes were cooking, I started to cook the bacon in a large saute pan which had been pre-heating over a medium heat. The point of cooking the bacon was not only to get it crispy, but also to render out all of that wonderful bacon fat that I would use for the bacon vinaigrette.

After the bacon was nicely crisped, I used a slotted spoon to remove the bacon from the pan while leaving the drippings behind. After the bacon was removed, I poured most of the bacon fat from the pan into a small glass dish (don't use plastic or it might melt) and reserved about 2 tablespoons of the fat in the pan. I then added the diced onions (or leeks) and a healthy pinch of salt and freshly cracked pepper (remember, bacon fat can be salty, so be judicious) and sauteed them until they were translucent and soft.

Here was a shot of the reserved bacon bits and the small bowl of lovely bacon fat from which I built the dressing for the salad:

At this point my sweet potatoes, bacon, and leeks were cooked completely. To the cooked potatoes already in a large boil, I scraped in the contents of my saute pan and added about 3/4 of the crispy bacon bits:

I next turned my attention to the warm bacon dressing. Here were the ingredients necessary (except for the chervil ... somehow that managed to get in the shot, too):

For the dressing, I needed:
1/3 cup bacon fat
1/3 cup sherry vinegar (red or white wine would also work well)
1 fat spoonful of Dijon mustard
1-2 teaspoon honey
salt and pepper to taste (be careful with the salt as the bacon fat can be salty)
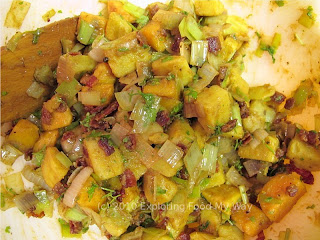
The goal for the vinaigrette was balance: sweet, salty, smoky, and tangy. Use my numbers as a jumping off point for how you prefer it. Place the contents into a small mason jar and give it a good shake, or do what I did and simply whisked them together in a mixing bowl. With the dressing finished, I added all of it to the bowl with the potatoes, onions/leeks, and bacon. I then threw in a handful of chopped tarragon (chervil) and with a large wooden spoon, GENTLY tossed the mixture to combine. Because the sweet potatoes only absorbed some of the seasoning from the salted boiling water, I needed to adjust the salt and pepper to get the final salad where it needed to be.
Here was a shot of the finished salad, tossed to perfection:

Et voila! You are done and can happily serve this right away (to what I am sure will be a very eager and hungry crowd), or you can let the flavors sit and marry overnight in the refrigerator. I would, however, let it at least come to room temperature before serving it the next day. This will easily make between 4 and 6 servings, depending on how hungry your guests are and what else you are serving.

And, of course, I couldn't leave you stranded without the gratuitous close-up shot of just the potato salad:

Bon appetit!
Monday, August 23, 2010
Kitchen Challenge: Bread Out Of A Campfire Oven?
I've come to discover over the years as a bread baker, good bread can come out of almost any oven. While most people assume that you need a top-of-the-line Viking or Wolf range costing in excess of $5,000 in order to get good results, it turns out that good technique almost always triumphs expensive hardware. While there are certainly kitchen tools that I use in my routine baking that I would be sad to see go (like my KitchenAid Pro 600 or my digital scale) since they make my job easier and more consistent, in the end, almost any oven will work and can be cajoled into sending out the wonderful aroma of baking bread.
To prove this point, I was recently contacted by Beth Knorr, manager of the Countryside Conservancy and more specifically, the Howe Meadow farmers market that I've written about several times before, and was asked if I'd like to do a cooking demonstration during one of the weekly Saturday markets. Intrigued (and honestly, quite flattered) by this notion, Beth and I compared datebooks until we agreed that my demo would take place from 9 am - noon on Saturday, August 21st. At the time Beth initially contacted me, I still had some time to plan what dishes I wanted to make and as my weekend got closer, I stopped by the market to see what types of products and produce I would be able to use.
Fortunately, one of the purveyors, Alex from Mud Run Farms, was still selling his two pound bags of freshly ground whole wheat flour. I had used this flour in a previous entry when I made whole wheat fettuccine (recipe is at the link) for a dinner I cooked for my grandmother and me. I decided that I should stick to what I know best and make my honey whole wheat bread while highlighting the flour that Alex was selling at his stand. I bought several bags of the flour from him a week prior to my demo anticipating that I might need some in doing my preparations the night before the big event.
The bread recipe I would be using today has gone through several iterations as I've added, removed, and changed ingredient amounts to make it taste better and better. For those who might feel challenged at making bread, I will give you the simpler "dump and stir" recipe. While it's still a tasty bread, the tweaks I will be presenting (and the extra time required) for the more complicated recipe are well worth your time and effort. Both recipes use the same amount of ingredients, it's just that my tweaked version has you using some of the ingredients the night before.
Here's the dump and stir recipe:
Honey Whole Wheat Bread
325 grams Bread flour
425 grams Whole Wheat flour
14 grams (1 tbsp) Canola oil or Light Olive oil
42 grams Honey
26 grams Wheat germ
50 grams Ground flax seeds
8 grams Instant yeast (use 10 grams of Active dried)
17 grams Sea salt
540 grams Water, room temperature
You will notice, gentle reader, that everything I measure is in grams or ounces. Weighing ingredients is FAR more accurate than measuring by volume (i.e., cups). It's worth your while to spend the $30 on a digital scale accurate to the gram. It's a shame that 99% of cookbooks out there don't measure by weight; I think people who are scared of baking because recipes don't turn out well would have much better results were they to measure by weight rather than volume.
Now that I've given you the basic recipe, let's proceed to my tweaked version. The night before you want to make the dough (or do this in the morning if you want to bake at night), you need to make two items, a soaker and a pre-ferment called a poolish. For these items you'll need both the bread flour and the whole wheat flour:

In a container big enough to hold both the whole wheat flour and the water, measure out:
200 grams Whole Wheat flour
250 grams Water, room temperature
Using a fork, gently stir the two together and make sure that all of the flour is hydrated. Cover the container and place it in the refrigerator. Congratulations, you've just made a soaker! A soaker is used to pre-hydrate some of the flour in order to not only give it a chance to fully hydrate before being used, but also to help start breaking down some of the more complex carbohydrates into simpler sugars that the yeast will use for food. The reason that you place the soaker into the refrigerator is that all flours contain naturally occurring wild yeasts in them and if you let it sit out overnight, those yeasts might actually start to grow.
Here is what the finished soaker should look like:

It doesn't look particularly appetizing to you or me, but trust me, the yeast will love it.
Next up we need to make the other pre-ferment, the poolish. A poolish almost always consists of equal weights of bread flour and water with just a tiny pinch of yeast. For the poolish, you will need:
250 grams Bread flour
250 grams Water, room temperature
2 grams Instant yeast
Place these ingredients into a large container and using a wooden spoon, vigorously stir the ingredients to combine. You are looking to not only hydrate the flour, but also start the activation of the gluten. It only takes about twenty seconds of vigorous stirring and what you end up with looks like a really thick pancake batter:

Again, cover the container and put it into the warmest part of your kitchen (I used the top of the refrigerator). After 8-10 hours, that little bit of starter will have transformed into this:

Note that when I first put the poolish into this container, it measured at less than 1 quart (I also made a double batch of poolish, so a 2 quart container will probably be big enough for a single batch). The finished poolish nearly tripled in volume. When you take the lid off, you will notice the delicate structure of the dough and all of the bubbles at the surface. Take a deep breath and smell decidedly alcoholic aroma which comes from the yeast's consumption of the sugars in the flour; this is a sign that it's ready to use.
Now that we've done our pre-dough work, let's take a look at the rest of the ingredients:

For today's bread, I ended up using grapeseed oil instead of Canola. You really can use any light tasting oil from your pantry. To add an extra layer of punch, you could also substitute pumpkin seed oil. Having finished my soaker and poolish, I went ahead and measured out the dry and wet ingredients for the following morning. This technique is called mise en place and is literally French for "everything in its place." It's a wonderful method for making sure you have all of the ingredients for your recipe by first measuring each out into its own container before combining to make the recipe.
First I measured out the remainder of my dry ingredients (minus the salt):
75 grams Bread flour
225 grams Whole Wheat flour
26 grams Wheat germ
50 grams Ground Flax seed (also called meal)
6 grams Instant yeast (or 1 packet of Active dried)
These I placed into a single container and mixed with a fork to combine:

I placed a lid on this and just left it on the counter for the next morning. Next, I measured out my wet ingredients and my salt:
14 grams Canola oil
42 grams Honey
17 grams Sea salt

Even though the salt is considered a dry ingredient, you don't want to mix it in with the yeast because it might kill it before you have a chance to activate it in your mixer. All my pre-baking work now done, I retired for the rest of the evening.
The following morning, I got up nice and early and pulled out my trusty KitchenAid mixer with dough hook attachment. In the large stainless steel bowl, I used a flexible scraper (you could also use a spatula) to add in all of the poolish and soaker into the bowl. I then dumped the contents of my pre-measured dry and wet ingredients into the bowl on top of them. I kept the salt aside for now.
At this point, I measured out:
40 grams Water, room temperature
You might need it, you might not. I attached both the bowl and dough hook to the mixer and turned it to the first position ("1") to begin mixing the ingredients. After about thirty seconds, I adjusted the mixer to the second position ("2") and gradually added the salt to the dough in a continuous stream. After adding the salt, I set my timer for six minutes and let the machine continue to knead the dough. Today I didn't need to add any additional water, but during those six minutes of kneading, use the extra water if the dough is looking dry and not coming together nicely. The dough should be fairly wet, which means it will be a little sticky to the touch.
After my six minutes of kneading, I turned the machine off, detached the bowl and walked it over to my large plastic proofing container:

It is important that you oil your container or the dough might stick very badly when it is time to turn it out onto your work surface. I used a pan release spray, but if you wanted to oil the container by hand, you could certainly do that, too. Use your flexible bowl scraper to transfer the dough from the bowl to the container and place the lid on.
The dough will now go through two rises. The first rise normally takes about 60-90 minutes, depending on the warmth of your kitchen. For me, I made my second dough, packed everything up into my car and headed to the market. Ninety minutes after making my first dough, it had grown quite a bit:

At this point, I used my flexible bowl scraper (it's quite the handy tool, no?) to "punch down" the dough by "grabbing" the dough at the edges of the container and folding the dough onto itself in the middle. I worked my way completely around the container. At this point, you re-cover the dough and let it go through a second rising. Folding the dough over onto itself allows you to redistribute both the yeast and the flour that feeds it. The second rising usually takes about 1/2-2/3 the amount of time as the first.
When the dough has risen for the second time, it is time to divide the dough evenly and create the final shapes. The recipe I've posted above makes roughly three (3) pounds of dough. When I bake on my pizza stone, I normally make three one pound balls, or boules. Because of the size of the camping stove I was using today, that wouldn't be possible. Instead, I brought out my loaf pans and made two 1 1/2 pound loaves instead.
Using my digital scale, I divided the dough evenly. I then prepped my loaf pans by spraying them with more of the pan release spray I had used earlier. To shape the loaves, take one of the halves and place it on your work surface. Flatten it out slightly and then grasp both the left and right ends and slightly pull them out before folding them back onto the dough. Then, using your thumbs and palm, start at the top and begin to fold the dough down towards the bottom, a little at a time, three to four tucks being plenty.
Then, using your palms, gently adjust the "log" so that it looks fairly even and place the formed loaf with the seem side down in your loaf pan:

Here were my two formed loaves:

Cover this with a tea towel and allow them to proof until the dough has mostly filled the pan. Depending on how warm it is (and it was pretty warm at the farmer's market), this could take 30-45 minutes.
When you've got about fifteen minutes left before the loaves are fully proofed, turn your oven on to 375 degrees Fahrenheit. Unfortunately, today's oven,

was wildly inconsistent in the temperature gauge. When I first turned it on, I set the knob for the oven to "hi". This yielded me an internal temperature of 500+ degrees (according to the temperature gauge on the oven itself). Even with the knob turned all the way to "low", the gauge still read a balmy 425 degrees. At this point, the bread was fully proofed and I had no other option than to just give it the old college try.
Place the loaves on the same rack in the middle of your oven, giving them a little space between the actual pans. After ten minutes, lower the oven temperature to 350 degrees and continue to cook for another 20-25 minutes. Half way through the cooking time, you may also have to rotate the loaves from from to back and left to right if your oven has hot spots (and most ovens do). To check whether the bread is done, remove a loaf from the oven and flip it out of the loaf pan using hot pads or a tea towel. Plunge an instant read thermometer into the bottom of the loaf (where no one will see the hole) and make sure the probe goes into the center of the loaf:

The proper internal temperature needs to reach 190-195 degrees Fahrenheit. Remarkably, in my case at the market, it had actually reached the correct temperature, so I removed the other loaf from the oven, flipped it out of the loaf pan and placed both loaves onto a cooling rack:

Having successfully made the first batch of bread, I turned to pan up my second batch only to discover that the heating element of the campfire oven had turned off and nothing I tried would successfully re-light it. In the end, the above two loaves were actually enough to feed the hungry and intrigued crowds who stopped by my booth to try and discover where the wonderful bread smell had originated. When I pointed out that the bread had just come out of the camping stove, I got many wide-eyed stares and the occasional, "REALLY?"
While you will want to wait 45-60 minutes for your bread to fully cool before slicing into it (this allows the gelatinized starches to fully set and give the bread its final structure), I only managed to stave off the hungry onlookers for about ten minutes before I acquiesced and began to feed the gathering masses:

Fortunately, the two loaves that I did manage to bake came out nearly perfect and somewhat serendipitously were just the right amount of samples to feed anyone who wanted a taste. Almost everyone commented on how wonderful the bread tasted, which I took both as a compliment to the recipe I've developed over the years, but also the fantastic flour that I bought from Mud Run Farms. If you want the best results from your cooking and baking, always start with the best ingredients you can afford.
The demonstration now complete, I packed up all my gear and lugged it back to my car. Physically I was tired and sore from all of the standing, but emotionally I was totally thrilled that not only did I get to meet some great market attendees, but also got to feed them some tasty and healthy bread as well. I hope you do give this recipe a try; it might just make a whole wheat bread convert out of you if you already aren't a lover.
To prove this point, I was recently contacted by Beth Knorr, manager of the Countryside Conservancy and more specifically, the Howe Meadow farmers market that I've written about several times before, and was asked if I'd like to do a cooking demonstration during one of the weekly Saturday markets. Intrigued (and honestly, quite flattered) by this notion, Beth and I compared datebooks until we agreed that my demo would take place from 9 am - noon on Saturday, August 21st. At the time Beth initially contacted me, I still had some time to plan what dishes I wanted to make and as my weekend got closer, I stopped by the market to see what types of products and produce I would be able to use.
Fortunately, one of the purveyors, Alex from Mud Run Farms, was still selling his two pound bags of freshly ground whole wheat flour. I had used this flour in a previous entry when I made whole wheat fettuccine (recipe is at the link) for a dinner I cooked for my grandmother and me. I decided that I should stick to what I know best and make my honey whole wheat bread while highlighting the flour that Alex was selling at his stand. I bought several bags of the flour from him a week prior to my demo anticipating that I might need some in doing my preparations the night before the big event.
The bread recipe I would be using today has gone through several iterations as I've added, removed, and changed ingredient amounts to make it taste better and better. For those who might feel challenged at making bread, I will give you the simpler "dump and stir" recipe. While it's still a tasty bread, the tweaks I will be presenting (and the extra time required) for the more complicated recipe are well worth your time and effort. Both recipes use the same amount of ingredients, it's just that my tweaked version has you using some of the ingredients the night before.
Here's the dump and stir recipe:
Honey Whole Wheat Bread
325 grams Bread flour
425 grams Whole Wheat flour
14 grams (1 tbsp) Canola oil or Light Olive oil
42 grams Honey
26 grams Wheat germ
50 grams Ground flax seeds
8 grams Instant yeast (use 10 grams of Active dried)
17 grams Sea salt
540 grams Water, room temperature
You will notice, gentle reader, that everything I measure is in grams or ounces. Weighing ingredients is FAR more accurate than measuring by volume (i.e., cups). It's worth your while to spend the $30 on a digital scale accurate to the gram. It's a shame that 99% of cookbooks out there don't measure by weight; I think people who are scared of baking because recipes don't turn out well would have much better results were they to measure by weight rather than volume.
Now that I've given you the basic recipe, let's proceed to my tweaked version. The night before you want to make the dough (or do this in the morning if you want to bake at night), you need to make two items, a soaker and a pre-ferment called a poolish. For these items you'll need both the bread flour and the whole wheat flour:

In a container big enough to hold both the whole wheat flour and the water, measure out:
200 grams Whole Wheat flour
250 grams Water, room temperature
Using a fork, gently stir the two together and make sure that all of the flour is hydrated. Cover the container and place it in the refrigerator. Congratulations, you've just made a soaker! A soaker is used to pre-hydrate some of the flour in order to not only give it a chance to fully hydrate before being used, but also to help start breaking down some of the more complex carbohydrates into simpler sugars that the yeast will use for food. The reason that you place the soaker into the refrigerator is that all flours contain naturally occurring wild yeasts in them and if you let it sit out overnight, those yeasts might actually start to grow.
Here is what the finished soaker should look like:

It doesn't look particularly appetizing to you or me, but trust me, the yeast will love it.
Next up we need to make the other pre-ferment, the poolish. A poolish almost always consists of equal weights of bread flour and water with just a tiny pinch of yeast. For the poolish, you will need:
250 grams Bread flour
250 grams Water, room temperature
2 grams Instant yeast
Place these ingredients into a large container and using a wooden spoon, vigorously stir the ingredients to combine. You are looking to not only hydrate the flour, but also start the activation of the gluten. It only takes about twenty seconds of vigorous stirring and what you end up with looks like a really thick pancake batter:

Again, cover the container and put it into the warmest part of your kitchen (I used the top of the refrigerator). After 8-10 hours, that little bit of starter will have transformed into this:

Note that when I first put the poolish into this container, it measured at less than 1 quart (I also made a double batch of poolish, so a 2 quart container will probably be big enough for a single batch). The finished poolish nearly tripled in volume. When you take the lid off, you will notice the delicate structure of the dough and all of the bubbles at the surface. Take a deep breath and smell decidedly alcoholic aroma which comes from the yeast's consumption of the sugars in the flour; this is a sign that it's ready to use.
Now that we've done our pre-dough work, let's take a look at the rest of the ingredients:

For today's bread, I ended up using grapeseed oil instead of Canola. You really can use any light tasting oil from your pantry. To add an extra layer of punch, you could also substitute pumpkin seed oil. Having finished my soaker and poolish, I went ahead and measured out the dry and wet ingredients for the following morning. This technique is called mise en place and is literally French for "everything in its place." It's a wonderful method for making sure you have all of the ingredients for your recipe by first measuring each out into its own container before combining to make the recipe.
First I measured out the remainder of my dry ingredients (minus the salt):
75 grams Bread flour
225 grams Whole Wheat flour
26 grams Wheat germ
50 grams Ground Flax seed (also called meal)
6 grams Instant yeast (or 1 packet of Active dried)
These I placed into a single container and mixed with a fork to combine:

I placed a lid on this and just left it on the counter for the next morning. Next, I measured out my wet ingredients and my salt:
14 grams Canola oil
42 grams Honey
17 grams Sea salt

Even though the salt is considered a dry ingredient, you don't want to mix it in with the yeast because it might kill it before you have a chance to activate it in your mixer. All my pre-baking work now done, I retired for the rest of the evening.
The following morning, I got up nice and early and pulled out my trusty KitchenAid mixer with dough hook attachment. In the large stainless steel bowl, I used a flexible scraper (you could also use a spatula) to add in all of the poolish and soaker into the bowl. I then dumped the contents of my pre-measured dry and wet ingredients into the bowl on top of them. I kept the salt aside for now.
At this point, I measured out:
40 grams Water, room temperature
You might need it, you might not. I attached both the bowl and dough hook to the mixer and turned it to the first position ("1") to begin mixing the ingredients. After about thirty seconds, I adjusted the mixer to the second position ("2") and gradually added the salt to the dough in a continuous stream. After adding the salt, I set my timer for six minutes and let the machine continue to knead the dough. Today I didn't need to add any additional water, but during those six minutes of kneading, use the extra water if the dough is looking dry and not coming together nicely. The dough should be fairly wet, which means it will be a little sticky to the touch.
After my six minutes of kneading, I turned the machine off, detached the bowl and walked it over to my large plastic proofing container:

It is important that you oil your container or the dough might stick very badly when it is time to turn it out onto your work surface. I used a pan release spray, but if you wanted to oil the container by hand, you could certainly do that, too. Use your flexible bowl scraper to transfer the dough from the bowl to the container and place the lid on.
The dough will now go through two rises. The first rise normally takes about 60-90 minutes, depending on the warmth of your kitchen. For me, I made my second dough, packed everything up into my car and headed to the market. Ninety minutes after making my first dough, it had grown quite a bit:

At this point, I used my flexible bowl scraper (it's quite the handy tool, no?) to "punch down" the dough by "grabbing" the dough at the edges of the container and folding the dough onto itself in the middle. I worked my way completely around the container. At this point, you re-cover the dough and let it go through a second rising. Folding the dough over onto itself allows you to redistribute both the yeast and the flour that feeds it. The second rising usually takes about 1/2-2/3 the amount of time as the first.
When the dough has risen for the second time, it is time to divide the dough evenly and create the final shapes. The recipe I've posted above makes roughly three (3) pounds of dough. When I bake on my pizza stone, I normally make three one pound balls, or boules. Because of the size of the camping stove I was using today, that wouldn't be possible. Instead, I brought out my loaf pans and made two 1 1/2 pound loaves instead.
Using my digital scale, I divided the dough evenly. I then prepped my loaf pans by spraying them with more of the pan release spray I had used earlier. To shape the loaves, take one of the halves and place it on your work surface. Flatten it out slightly and then grasp both the left and right ends and slightly pull them out before folding them back onto the dough. Then, using your thumbs and palm, start at the top and begin to fold the dough down towards the bottom, a little at a time, three to four tucks being plenty.
Then, using your palms, gently adjust the "log" so that it looks fairly even and place the formed loaf with the seem side down in your loaf pan:

Here were my two formed loaves:

Cover this with a tea towel and allow them to proof until the dough has mostly filled the pan. Depending on how warm it is (and it was pretty warm at the farmer's market), this could take 30-45 minutes.
When you've got about fifteen minutes left before the loaves are fully proofed, turn your oven on to 375 degrees Fahrenheit. Unfortunately, today's oven,

was wildly inconsistent in the temperature gauge. When I first turned it on, I set the knob for the oven to "hi". This yielded me an internal temperature of 500+ degrees (according to the temperature gauge on the oven itself). Even with the knob turned all the way to "low", the gauge still read a balmy 425 degrees. At this point, the bread was fully proofed and I had no other option than to just give it the old college try.
Place the loaves on the same rack in the middle of your oven, giving them a little space between the actual pans. After ten minutes, lower the oven temperature to 350 degrees and continue to cook for another 20-25 minutes. Half way through the cooking time, you may also have to rotate the loaves from from to back and left to right if your oven has hot spots (and most ovens do). To check whether the bread is done, remove a loaf from the oven and flip it out of the loaf pan using hot pads or a tea towel. Plunge an instant read thermometer into the bottom of the loaf (where no one will see the hole) and make sure the probe goes into the center of the loaf:

The proper internal temperature needs to reach 190-195 degrees Fahrenheit. Remarkably, in my case at the market, it had actually reached the correct temperature, so I removed the other loaf from the oven, flipped it out of the loaf pan and placed both loaves onto a cooling rack:

Having successfully made the first batch of bread, I turned to pan up my second batch only to discover that the heating element of the campfire oven had turned off and nothing I tried would successfully re-light it. In the end, the above two loaves were actually enough to feed the hungry and intrigued crowds who stopped by my booth to try and discover where the wonderful bread smell had originated. When I pointed out that the bread had just come out of the camping stove, I got many wide-eyed stares and the occasional, "REALLY?"
While you will want to wait 45-60 minutes for your bread to fully cool before slicing into it (this allows the gelatinized starches to fully set and give the bread its final structure), I only managed to stave off the hungry onlookers for about ten minutes before I acquiesced and began to feed the gathering masses:

Fortunately, the two loaves that I did manage to bake came out nearly perfect and somewhat serendipitously were just the right amount of samples to feed anyone who wanted a taste. Almost everyone commented on how wonderful the bread tasted, which I took both as a compliment to the recipe I've developed over the years, but also the fantastic flour that I bought from Mud Run Farms. If you want the best results from your cooking and baking, always start with the best ingredients you can afford.
The demonstration now complete, I packed up all my gear and lugged it back to my car. Physically I was tired and sore from all of the standing, but emotionally I was totally thrilled that not only did I get to meet some great market attendees, but also got to feed them some tasty and healthy bread as well. I hope you do give this recipe a try; it might just make a whole wheat bread convert out of you if you already aren't a lover.
Sunday, June 13, 2010
Kitchen Challenge: Roasted Beets And Whole Wheat Pasta
I won't go on and on about how much I enjoy the challenge of cooking from ingredients I find at the local farmer's market because I've done that before and I don't want to sound like a broken record. That being said, today's visit to the Howe Meadow farmer's market in Peninsula, Ohio, yielded me some tasty ingredients. Besides my usual stop at the Humble Pie Baking Company table to pick up my pie from my friend Diane, I made several other stops while wandering around the partially shaded grassy field. What I walked away with were some fresh beets along with their tops, a small container of goat cheese from Lake Erie Creamery, two pounds of freshly ground whole wheat flour from Mud Run Farms, a one pound sack of fresh sugar snap peas, and a bag of fresh, lovely smelling basil.
In trying to come up with dinner tonight for my grandmother, I decided to do a roasted beet salad for a starter and finish it up with a entrée of seared pork chops, a homemade whole wheat pasta that I would toss in the cooked beet greens, some rendered bacon and garlic, and the sugar snap peas, first blanched and then finished off by searing in some butter. The only complication was that I didn't have my pasta rolling machine with me and I've never rolled pasta by hand before. Then again, given that these machines are only recent additions to the home kitchen and pasta has been around for thousands of years, it was obviously possible and I was certainly capable of giving it the "old college try."
When I got to my grandmother's condo, I set about making the roasted beets. Here was a shot of the ingredients required to roast the beets:

My first task was to turn on the oven and set the thermostat to 400 degrees Fahrenheit. Next, I cut the beets from the stalks, placed a single piece of aluminum foil inside the pie tin and placed the cut and washed beets in the center of the foil. I added just enough olive oil to coat the beets. Here was a shot of the beets ready to be packaged up and roasted:

To package the beets, I simply folded the sides of the aluminum foil up over the top of the beets and crimped it shut. Depending on the size of your beats (and the number), the roasting time will vary. I checked after fifty minutes and while my paring knife slid easily through the outer layer of the beets, there was still just a tiny bit of resistance left. So, I let them roast another five minutes.
After they came out of the oven, I opened up the package to let them cool slightly:

After about ten minutes, they were cool enough to handle. To remove the skins and minimize staining, run the beets under cold water. To remove the skins, I just used a paper towel to rub the skins right off. It really was a pretty simple thing to do. Here was a shot of the finished roasted beets:

You could eat them warm right now or put them in the refrigerator for later if you wanted to eat them cold. Since my plan was to use them in a salad, cold was perfect. You could certainly do this step well in advance, even the day before.
Next up I turned my attention to making the whole wheat pasta. Here was a shot of the ingredients:

While you could certainly try and make whole wheat pasta with 100% whole wheat flour, it can get a little tricky and that flavor might be off-putting to some people. And since I was cooking for more than just me today, I decided to do a 50/50 blend between the whole wheat flour I got from Mud Run Farm and the AP (all purpose) flour I knew that my grandmother already had. The basic rule of thumb for fresh pasta is two large eggs for every pound of flour. So today I used:
227 grams whole wheat flour
227 grams AP flour
2 large eggs
1 tbsp extra virgin olive oil
2 pinches (roughly 1/4 tsp.) course sea salt
If you are using fine granulated salt, use half as much. You will also need about 1/8-1/4 cup of water, depending on how humid the air is as well as how old the flour is. Today I probably ended up needing the entire 1/4 cup. Also know that whole wheat flour absorbs more water per ounce than AP flour does, so if you decide to make the pasta with 100% AP flour, you would probably need less water.
After mixing the salt with the flours, I dumped it out onto my grandmother's counter and made a large well in the middle. I then scrambled the eggs and olive oil until it was well blended and then poured it into the middle of the well:

Using a fork, I gradually began to incorporate the flour from the inner edges of the wall and stirred it into the egg mixture. Don't be alarmed if, as you get close to the outer edge, you get an egg leak. I did and that was about the time that I switched from a fork to this VERY handy tool:

This is a metal bench scraper and is your best friend when making pasta. It allowed me to fold over large section of the emerging dough onto itself and keep the work surface clean. I used this while getting the dough to come together. At first the dough stayed quite crumbly and didn't want to come together, but after working at it for about five minutes and adding additional water, it eventually became a ball of dough. I could tell, however, based on the feeling of the dough and the fact that when I kneaded it under my palm (it basically tore instead of stretched), that I need to let this dough ball rest for about twenty minutes or so. This would give it time to allow the flour to fully hydrate and the gluten to begin to form. I formed the dough into a ball and covered it with plastic wrap:

After the twenty minute rest, I unwrapped and began to knead it again for another five minutes or so. BIG DIFFERENCE. The one rule that I always tell people when working with pasta or bread dough ... if something isn't working, if it isn't rolling out properly, cover it and give it a rest. Even five minutes of resting time will make a big difference. After the five minutes of additional kneading, the dough felt supple and when I stretched it with the palm of my hand, the dough didn't tear. I reformed it into a ball and then flattened it slightly into a disc, re-covered it with plastic wrap and this time I put it into the refrigerator since I wouldn't be rolling the pasta out for several more hours.
Here was what I put into the refrigerator:

You could also do this part ahead of time, although I wouldn't make the pasta too far in advance (maybe a day or two max). You could also freeze the dough at this point by double wrapping in plastic wrap and then placing in a freezer bag. Frozen dough could be made well in advance. The multi-hour rest also helped the gluten in the dough to relax, which made rolling the dough out much easier.
To roll the dough out, I unwrapped the dough, cut it into quarters, and then dusted both my work surface and the top of the quarter of dough:

Using my grandmother's rolling pin, I began at the center of the dough and rolled outward. Always start at the center and work your way outward. You'll get a more evenly rolled out piece of dough that way. Also, lift, rotate, and flip the dough often so that you make sure it doesn't stick to the counter. Add additional flour as needed, but try and use as little as possible as too much flour at this point will toughen the pasta. As I was rolling out my first piece, I noticed that the dough was fighting me, springing back when I rolled it out. So I decided to set it aside and work on the second piece. Each piece fought me and as each did, I set it aside.
When I got back to the first piece, it had relaxed and I was able to roll out this final shape:

I then used my chefs knife to trim off the irregular sides to make it either a square or a rectangle (depending on how good your rolling skills are). I then made sure the side facing me had a nice light even layer of flour on it and folded the pasta twice, both in the same direction, bottom to top. This made cutting the noodles really easy as I could go through four layers at the same time. After cutting all the noodles (and I was going for a wider fettuccine noodle today, you could certainly do spaghetti or angel hair if you are a true masochist), I opened each one up and loosely piled them together. To this "nest," I added a sprinkling of more AP flour and then used to my hands to "fluff" the nest, thus coating each noodle with just a little bit of the flour so that the noodles wouldn't stick together. After rolling out my four quarters of dough and cutting into noodles, I noticed that I had enough scraps of dough from the four quarters to mash together and get a fifth nest out of it.
Here was a shot of the fettucine nests, floured and ready to be cooked:

As it turned out, only three of these nests were required for dinner tonight, so I individually froze the other two nests in plastic baggies and then put them together inside a freezer bag for long term storage. That gives my grandmother two additional portions of fresh pasta she can use whenever she wants them. To cook them, dump them into boiling water still frozen and boil for about 4-5 minutes or until the noodles float to the top.
My pasta noodles cut and bundled, I turned my attention to the sugar snap peas. One of my favorite tricks with vegetables is to blanch them and shock them in cold water to stop the cooking. Once drained, they can hang out for hours until you are ready to finish them off. After snapping the peas and removing the string that runs along the inside of the vegetable, I set them next to the pot while I waited for it to come to a boil:

If you have more vegetables than will fit in your pot in a single layer, blanch them in stages. Today, I was able to fit them all in:

Once I tossed the peas into the boiling water, I blanched them for four minutes. You want them to be at the same time tender, but also still have a little bit of texture to them. Once the four minutes was up, I used a wire mesh strainer to move them to a bowl of iced water I had already prepared.
Knowing that the whole wheat pasta would cook within just a few minutes, I turned my attention next to the condiment in which I would toss the finished pasta. For my beet greens today, I removed the greens from the woodier stems, minced three cloves of garlic, and sliced five pieces of good old bacon:

The item on the bottom left was crushed red pepper flakes. Although grandma doesn't like it too spicy, I knew that a small pinch would add some character without making it too offensive. In my pre-heated skillet, I tossed in the bacon and cooked it until the bacon fat had rendered out and the bacon was crispy, maybe about five minutes.

To the cooked bacon, I added the garlic and sautéed it until I could smell the garlic and it began to brown slightly. I then added a pinch of the crushed red pepper and my chopped beet greens. Knowing that the greens needed some time to cook, I added about 1/2 cup of chicken stock to the pan, turned it down and covered it. This allowed the greens to steam. After about ten minutes, I checked on the greens and discovered that they had cooked down nicely and the chicken stock had now evaporated. Since I was still working my mojo with the four other components of the meal, I simply turned the burner off and let it stand until needed.
Next up, I turned my attention to the thick cut pork chops I had picked up at the local Giant Eagle. Here was my pork chop prep station today:

I seasoned each side of the pork chops with salt and freshly ground pepper. I then dredged each side in unseasoned AP flour, tapping to remove any excess. I added about a tablespoon of butter and a tablespoon of grapeseed oil to a pre-heated skillet, let the butter melt and brown slightly and added my massive chops. After cooking on the first side for three minutes, I flipped them over and sautéed them for three minutes more.
Here was a shot of the golden brown crust on the pork chops:

After three minutes on each side, I removed the chops from the pan and placed them on the foil lined tray of my grandmother's toaster oven (which I had set for 350 degrees Fahrenheit). I then finished them in the oven for another twelve to fifteen minutes or so. Ideally you want the chops to cook to about 155 degrees internally, because they will come up another 5 degrees or so while resting. And while I do enjoy my pork medium, that definitely wouldn't be acceptable for grandma.
By removing the pork from the sauté pan after cooking the chops also gave me a chance to build a pan sauce, too. I dumped out most of the fat (but without wiping out the pan) and added a healthy amount of chicken stock to the pan. Using my wooden spoon, I scraped all those lovely bits up from the bottom of the pan (also known as the fond). I then let the sauce reduce until it had a nice consistency and turned off the heat to whisk in two or three healthy pats of butter. I seasoned it with salt and pepper and added just a drop or two of sherry vinegar to balance out the mouth feel from the butter.
Just before dropping the pasta into the boiling water, I turned my attention to the roasted beet salad. I quartered the beets and arranged them on small salad plates. I then topped them with some of the goat cheese from Lake Erie Creamery (use a fork for this, it saves getting your hands all messy ... just scrape the fork tines repeatedly over the goat cheese and it will form crumbles), some fresh orange zest and a chiffonade of the fresh basil leaves I had obtained earlier in the day. To this, I added a sherry vinaigrette I had made from equal parts sherry vinegar and olive oil seasoned with a bit of salt and pepper to taste.
Here was the finished roasted beet salad:

I dropped the pasta into the boiling water and cooked it until it started floating on the surface, perhaps about three minutes. I then scooped it out using a mesh strainer and dumped it straight into the cooked beet greens, where a tossing with some tongs mixed the ingredients together. I then prepared a plate of food for myself and my grandmother. A couple slices of pork, a nest of pasta topped off with some freshly grated Romano cheese, and a spoonful of snap peas quickly sautéed in some butter and seasoned with salt and pepper:

Wow, so delicious and even with the additional fats I added (butter and olive/grapeseed oil), this still felt healthy. Having not eaten since the morning, I greedily devoured my portion. While grandma only ate about half of hers, she saved the rest of hers and ate it for lunch the next day. Even with having cooked only three of the five fettuccine bundles for tonight's dinner, the amount of food I had made today would've easily fed four hungry adults. And since nothing goes to waste (and I do mean nothing) in my grandmother's kitchen, I made up two extra plates of food, one destined for my grandmother's neighbor and one that I would have the next day for lunch, too.
My grandmother normally does the dishes when I cook, but because today had been a little hectic getting all of the components ready at the same time, I had used a few more dishes than usual. Not wanting to leave her with the mess that I created, I also helped her clean up and within about twenty minutes, other than the extra plates of food in the refrigerator, you couldn't even tell that I had been here today.
I know that homemade pasta isn't on everyone's radar, even though it is quite lovely and delicious and pretty easy to make, even if it does take a bit of time. The roasted beets, however, are a no-brainer and in my opinion, one of the easiest and tastiest ways to enjoy this vegetable. I grew up with only canned beets in my house and until I discovered the deliciousness that roasted beets bring to the table thought that I was a beet hater. My eyes have been opened and my taste buds are much happier for it.
In trying to come up with dinner tonight for my grandmother, I decided to do a roasted beet salad for a starter and finish it up with a entrée of seared pork chops, a homemade whole wheat pasta that I would toss in the cooked beet greens, some rendered bacon and garlic, and the sugar snap peas, first blanched and then finished off by searing in some butter. The only complication was that I didn't have my pasta rolling machine with me and I've never rolled pasta by hand before. Then again, given that these machines are only recent additions to the home kitchen and pasta has been around for thousands of years, it was obviously possible and I was certainly capable of giving it the "old college try."
When I got to my grandmother's condo, I set about making the roasted beets. Here was a shot of the ingredients required to roast the beets:

My first task was to turn on the oven and set the thermostat to 400 degrees Fahrenheit. Next, I cut the beets from the stalks, placed a single piece of aluminum foil inside the pie tin and placed the cut and washed beets in the center of the foil. I added just enough olive oil to coat the beets. Here was a shot of the beets ready to be packaged up and roasted:

To package the beets, I simply folded the sides of the aluminum foil up over the top of the beets and crimped it shut. Depending on the size of your beats (and the number), the roasting time will vary. I checked after fifty minutes and while my paring knife slid easily through the outer layer of the beets, there was still just a tiny bit of resistance left. So, I let them roast another five minutes.
After they came out of the oven, I opened up the package to let them cool slightly:

After about ten minutes, they were cool enough to handle. To remove the skins and minimize staining, run the beets under cold water. To remove the skins, I just used a paper towel to rub the skins right off. It really was a pretty simple thing to do. Here was a shot of the finished roasted beets:

You could eat them warm right now or put them in the refrigerator for later if you wanted to eat them cold. Since my plan was to use them in a salad, cold was perfect. You could certainly do this step well in advance, even the day before.
Next up I turned my attention to making the whole wheat pasta. Here was a shot of the ingredients:

While you could certainly try and make whole wheat pasta with 100% whole wheat flour, it can get a little tricky and that flavor might be off-putting to some people. And since I was cooking for more than just me today, I decided to do a 50/50 blend between the whole wheat flour I got from Mud Run Farm and the AP (all purpose) flour I knew that my grandmother already had. The basic rule of thumb for fresh pasta is two large eggs for every pound of flour. So today I used:
227 grams whole wheat flour
227 grams AP flour
2 large eggs
1 tbsp extra virgin olive oil
2 pinches (roughly 1/4 tsp.) course sea salt
If you are using fine granulated salt, use half as much. You will also need about 1/8-1/4 cup of water, depending on how humid the air is as well as how old the flour is. Today I probably ended up needing the entire 1/4 cup. Also know that whole wheat flour absorbs more water per ounce than AP flour does, so if you decide to make the pasta with 100% AP flour, you would probably need less water.
After mixing the salt with the flours, I dumped it out onto my grandmother's counter and made a large well in the middle. I then scrambled the eggs and olive oil until it was well blended and then poured it into the middle of the well:

Using a fork, I gradually began to incorporate the flour from the inner edges of the wall and stirred it into the egg mixture. Don't be alarmed if, as you get close to the outer edge, you get an egg leak. I did and that was about the time that I switched from a fork to this VERY handy tool:

This is a metal bench scraper and is your best friend when making pasta. It allowed me to fold over large section of the emerging dough onto itself and keep the work surface clean. I used this while getting the dough to come together. At first the dough stayed quite crumbly and didn't want to come together, but after working at it for about five minutes and adding additional water, it eventually became a ball of dough. I could tell, however, based on the feeling of the dough and the fact that when I kneaded it under my palm (it basically tore instead of stretched), that I need to let this dough ball rest for about twenty minutes or so. This would give it time to allow the flour to fully hydrate and the gluten to begin to form. I formed the dough into a ball and covered it with plastic wrap:

After the twenty minute rest, I unwrapped and began to knead it again for another five minutes or so. BIG DIFFERENCE. The one rule that I always tell people when working with pasta or bread dough ... if something isn't working, if it isn't rolling out properly, cover it and give it a rest. Even five minutes of resting time will make a big difference. After the five minutes of additional kneading, the dough felt supple and when I stretched it with the palm of my hand, the dough didn't tear. I reformed it into a ball and then flattened it slightly into a disc, re-covered it with plastic wrap and this time I put it into the refrigerator since I wouldn't be rolling the pasta out for several more hours.
Here was what I put into the refrigerator:

You could also do this part ahead of time, although I wouldn't make the pasta too far in advance (maybe a day or two max). You could also freeze the dough at this point by double wrapping in plastic wrap and then placing in a freezer bag. Frozen dough could be made well in advance. The multi-hour rest also helped the gluten in the dough to relax, which made rolling the dough out much easier.
To roll the dough out, I unwrapped the dough, cut it into quarters, and then dusted both my work surface and the top of the quarter of dough:

Using my grandmother's rolling pin, I began at the center of the dough and rolled outward. Always start at the center and work your way outward. You'll get a more evenly rolled out piece of dough that way. Also, lift, rotate, and flip the dough often so that you make sure it doesn't stick to the counter. Add additional flour as needed, but try and use as little as possible as too much flour at this point will toughen the pasta. As I was rolling out my first piece, I noticed that the dough was fighting me, springing back when I rolled it out. So I decided to set it aside and work on the second piece. Each piece fought me and as each did, I set it aside.
When I got back to the first piece, it had relaxed and I was able to roll out this final shape:

I then used my chefs knife to trim off the irregular sides to make it either a square or a rectangle (depending on how good your rolling skills are). I then made sure the side facing me had a nice light even layer of flour on it and folded the pasta twice, both in the same direction, bottom to top. This made cutting the noodles really easy as I could go through four layers at the same time. After cutting all the noodles (and I was going for a wider fettuccine noodle today, you could certainly do spaghetti or angel hair if you are a true masochist), I opened each one up and loosely piled them together. To this "nest," I added a sprinkling of more AP flour and then used to my hands to "fluff" the nest, thus coating each noodle with just a little bit of the flour so that the noodles wouldn't stick together. After rolling out my four quarters of dough and cutting into noodles, I noticed that I had enough scraps of dough from the four quarters to mash together and get a fifth nest out of it.
Here was a shot of the fettucine nests, floured and ready to be cooked:

As it turned out, only three of these nests were required for dinner tonight, so I individually froze the other two nests in plastic baggies and then put them together inside a freezer bag for long term storage. That gives my grandmother two additional portions of fresh pasta she can use whenever she wants them. To cook them, dump them into boiling water still frozen and boil for about 4-5 minutes or until the noodles float to the top.
My pasta noodles cut and bundled, I turned my attention to the sugar snap peas. One of my favorite tricks with vegetables is to blanch them and shock them in cold water to stop the cooking. Once drained, they can hang out for hours until you are ready to finish them off. After snapping the peas and removing the string that runs along the inside of the vegetable, I set them next to the pot while I waited for it to come to a boil:

If you have more vegetables than will fit in your pot in a single layer, blanch them in stages. Today, I was able to fit them all in:

Once I tossed the peas into the boiling water, I blanched them for four minutes. You want them to be at the same time tender, but also still have a little bit of texture to them. Once the four minutes was up, I used a wire mesh strainer to move them to a bowl of iced water I had already prepared.
Knowing that the whole wheat pasta would cook within just a few minutes, I turned my attention next to the condiment in which I would toss the finished pasta. For my beet greens today, I removed the greens from the woodier stems, minced three cloves of garlic, and sliced five pieces of good old bacon:

The item on the bottom left was crushed red pepper flakes. Although grandma doesn't like it too spicy, I knew that a small pinch would add some character without making it too offensive. In my pre-heated skillet, I tossed in the bacon and cooked it until the bacon fat had rendered out and the bacon was crispy, maybe about five minutes.

To the cooked bacon, I added the garlic and sautéed it until I could smell the garlic and it began to brown slightly. I then added a pinch of the crushed red pepper and my chopped beet greens. Knowing that the greens needed some time to cook, I added about 1/2 cup of chicken stock to the pan, turned it down and covered it. This allowed the greens to steam. After about ten minutes, I checked on the greens and discovered that they had cooked down nicely and the chicken stock had now evaporated. Since I was still working my mojo with the four other components of the meal, I simply turned the burner off and let it stand until needed.
Next up, I turned my attention to the thick cut pork chops I had picked up at the local Giant Eagle. Here was my pork chop prep station today:

I seasoned each side of the pork chops with salt and freshly ground pepper. I then dredged each side in unseasoned AP flour, tapping to remove any excess. I added about a tablespoon of butter and a tablespoon of grapeseed oil to a pre-heated skillet, let the butter melt and brown slightly and added my massive chops. After cooking on the first side for three minutes, I flipped them over and sautéed them for three minutes more.
Here was a shot of the golden brown crust on the pork chops:

After three minutes on each side, I removed the chops from the pan and placed them on the foil lined tray of my grandmother's toaster oven (which I had set for 350 degrees Fahrenheit). I then finished them in the oven for another twelve to fifteen minutes or so. Ideally you want the chops to cook to about 155 degrees internally, because they will come up another 5 degrees or so while resting. And while I do enjoy my pork medium, that definitely wouldn't be acceptable for grandma.
By removing the pork from the sauté pan after cooking the chops also gave me a chance to build a pan sauce, too. I dumped out most of the fat (but without wiping out the pan) and added a healthy amount of chicken stock to the pan. Using my wooden spoon, I scraped all those lovely bits up from the bottom of the pan (also known as the fond). I then let the sauce reduce until it had a nice consistency and turned off the heat to whisk in two or three healthy pats of butter. I seasoned it with salt and pepper and added just a drop or two of sherry vinegar to balance out the mouth feel from the butter.
Just before dropping the pasta into the boiling water, I turned my attention to the roasted beet salad. I quartered the beets and arranged them on small salad plates. I then topped them with some of the goat cheese from Lake Erie Creamery (use a fork for this, it saves getting your hands all messy ... just scrape the fork tines repeatedly over the goat cheese and it will form crumbles), some fresh orange zest and a chiffonade of the fresh basil leaves I had obtained earlier in the day. To this, I added a sherry vinaigrette I had made from equal parts sherry vinegar and olive oil seasoned with a bit of salt and pepper to taste.
Here was the finished roasted beet salad:

I dropped the pasta into the boiling water and cooked it until it started floating on the surface, perhaps about three minutes. I then scooped it out using a mesh strainer and dumped it straight into the cooked beet greens, where a tossing with some tongs mixed the ingredients together. I then prepared a plate of food for myself and my grandmother. A couple slices of pork, a nest of pasta topped off with some freshly grated Romano cheese, and a spoonful of snap peas quickly sautéed in some butter and seasoned with salt and pepper:

Wow, so delicious and even with the additional fats I added (butter and olive/grapeseed oil), this still felt healthy. Having not eaten since the morning, I greedily devoured my portion. While grandma only ate about half of hers, she saved the rest of hers and ate it for lunch the next day. Even with having cooked only three of the five fettuccine bundles for tonight's dinner, the amount of food I had made today would've easily fed four hungry adults. And since nothing goes to waste (and I do mean nothing) in my grandmother's kitchen, I made up two extra plates of food, one destined for my grandmother's neighbor and one that I would have the next day for lunch, too.
My grandmother normally does the dishes when I cook, but because today had been a little hectic getting all of the components ready at the same time, I had used a few more dishes than usual. Not wanting to leave her with the mess that I created, I also helped her clean up and within about twenty minutes, other than the extra plates of food in the refrigerator, you couldn't even tell that I had been here today.
I know that homemade pasta isn't on everyone's radar, even though it is quite lovely and delicious and pretty easy to make, even if it does take a bit of time. The roasted beets, however, are a no-brainer and in my opinion, one of the easiest and tastiest ways to enjoy this vegetable. I grew up with only canned beets in my house and until I discovered the deliciousness that roasted beets bring to the table thought that I was a beet hater. My eyes have been opened and my taste buds are much happier for it.
Saturday, May 22, 2010
Kitchen Challenge: When Life Gives You Green Tomatoes
One of the great things about shopping at a farmer's market is that I don't always have a clear idea of what dish will spring forth when I actually get to the kitchen. Sure, that forces you to be creative sometimes, but that is what makes life interesting, don't you think? Saturday, May 15th was the first of many farmer's markets at the Howe Meadow location near Peninsula, Ohio and I am eagerly looking forward to going back many times this summer to not only support my local farmers and merchants, but also to buy and prepare some really tasty meals. This early in the season, there wasn't a whole lot of choices in the vegetable categories and were literally no choices in the fruit category. Fortunately, I managed to snag a few finds.
Knowing that I would be coming over the next day to cook my grandmother a meal, I loaded up on some goodies, green tomatoes, a homemade loaf of spelt bread from Ms. Julie's Kitchen, and a wonderful local Ohio apple pie from Humble Pie Baking Company owned and operated by a dear friend of mine, Diane Sikorski. Last year she was selling her pies at the North Union Farmer's Market on the campus of The Cleveland Clinic every Wednesday and I can tell you, she developed an amazing following. While Diane is a personal friend and that might taint my objectivity about her products, damn, if her pies aren't fantastic! That I now can get them every Saturday at a market much more local to me is a big plus in my book.
Originally I had thought of doing a simple fried treatment to the green tomatoes, but as soon as I loaded up my car and headed out of the market into the cool spring air, it immediately hit me: Grandma can't do seeds. And even though green tomatoes have smaller seeds than when they are fully ripe, seeds are still seeds. When I talked with my grandmother about our dinner plans, she indicated that she had some pork chops she needed to use up. Hmmm ... it sent my mind spinning for a little bit until I came up with turned out to be a very tasty solution. Tonight for dinner I would be making a panko crusted seared pork chop and top it with a green tomato salsa! Yes, that's it. I decided to wait until I got to the grocery store to see what else could inspire me.
The whole point of a salsa is to mix up the flavors a little bit; you want it a little sweet, a little sour, a little heat, and a lot of herbaceous cilantro flavor. With the discovery of an actual ripe mango in mid-May at the grocery store, here was the list of ingredients I assembled:

Starting in the rear and rotating clockwise, you have a single ripe mango, fresh cilantro, green tomatoes, a Jalapeno chile, three Persian limes and right in the middle was a Vidalia onion. Other than that, the only additional ingredients I used were salt and just a bit of honey to balance the acid from the lime juice. Here was the ratio of ingredients I used for the resulting green tomato mango salsa:
2 green tomatoes, seeded and diced finely
1/2 medium sweet onion, diced finely
3/4 mango, diced finely
1/2 Jalapeno, seeded, ribbed, and diced REAL finely
After pulling out my mad knife skills and trying my best to brunoise everything so that it was all the same size, I ended up with a bowl of finely chopped fruit and vegetables:

To this I added the juice from 1 1/2 limes, roughly 2 tablespoons of chopped cilantro (you can use the stems, too), sea salt, and just a touch of honey, maybe only 1 teaspoon or so, enough to cut through some of the acidity of the lime, but not enough to make it "sweet." Toss gently with a spoon to combine all of the ingredients. Taste and readjust as necessary. Since salsa really is a pretty straightforward dish, change the amounts of any of the ingredients to suit your taste.
Here was a picture of the salsa right before I covered it with a lid and it went into the refrigerator:

Next, I moved on to the fresh Brussels sprouts I had found at the supermarket. While they weren't local (being from Mexico), they did look fresh and enticing. Tonight I was going to do a sweet and sour Brussels sprouts treatment which involved steaming the halved sprouts in a bit of water, then pan searing in a combination of olive oil and butter and finishing off with a tossing in balsamic vinegar until the sugars in the vinegar caramelized and glazed the finished sprouts. Season with a little salt and freshly ground pepper, et voila!
Let's start with a shot of the ingredients required:

Here you see the two basics to any savory dish, salt and fresh pepper. In addition were the fresh Brussels sprouts, extra virgin olive oil, unsalted butter, and balsamic vinegar. First, I prepped the Brussels sprouts by cutting off the stem end and removing any extraneous outer leaves. Because these sprouts were fairly good sized, I cut each in half. Here was what I ended up with after prepping the above bag:

Having finished prepping the vegetable, I turned to my starch. My grandmother had originally suggested potatoes, but neither she nor I were feeling the love for potatoes tonight. So, when I went to the grocery store, I was looking around for an alternative when I came across these, Sophie's Choice Potato and Cheese Pierogi:

Sophie's Choice Pierogi is a local company based out of Garfield Heights and I have seen their pierogi in many Akron supermarkets. I had made pierogi for myself one other time before at my grandmother's condo and told her that I would make them for her the next time I had a chance. Well, today was the day. Being fully cooked, one can simply saute them in a bit of butter. Over the dozens of times I've made them, however, I tend to prefer the quick boil and then saute. This dual treatment renders them crispy on the outside and nice and creamy on the inside. Had I had any of the wonderful pierogi that Posh Pierogies sell at the Tremont Farmers Market, I would've gladly used those instead, although honestly, there is certainly nothing wrong with Sophie's brand.
Once I had all my ingredients prepped, I turned my attention to cooking equipment. My grandmother has a toaster oven that she uses primarily for toast. I, however, thought that it would be the perfect place to finish off the pork chops and keep them warm for service, freeing up the pan to saute my boiled pierogi. In addition, I wouldn't have to heat up her regular oven, keeping the kitchen cooler.

One thing to keep in mind though is that toaster ovens can vary wildly from what the thermostat is set at. Hers ran 50 degrees hotter than the setting on the dial, so I adjusted accordingly and set it to 150 degrees Fahrenheit.
On the stovetop tonight were three pots and pans:

On the back burner was a pot full of simmering water for the pierogi. On the front left was her non-stick skillet for the Brussels sprouts. The front right burner was for her stainless steel saute pan that I was going to be browning the pork chops and then sauteing the boiled pierogi.
Now that the food was prepped and the pans were placed, I turned my attention to the star of the plate, the pork chops. Here was a shot of them sitting on a paper towel, dried and ready to be breaded:

Note that I took the chops out of the refrigerator about thirty minutes before I needed them to let them come to room temperature. Next up was a shot of my breading station:

From left to right were all purpose flour, eggs, and Japanese panko dried bread crumbs. I really dig how well panko works as a coating for chicken and pork chops when sauteed in oil. To the flour and beaten eggs, I added a healthy pinch of salt and freshly cracked pepper which I stirred into each. The breading procedure, in case you've never done this before, consisted of dredging each chop through the flour, tapping to remove excess flour, then a dip in the beaten eggs, and finally placement in the panko bread crumbs where I made sure the entire surface was coated. The reason for all three is that the panko won't stick directly to the pork; the flour sticks to the meat, the egg sticks to the flour, and the panko sticks to the egg.
Here was a shot of the breaded pork chops:

Alright, time to get cooking! I put about two tablespoons of olive oil and a pat of butter into the saute pan, waited until the butter melted and went slightly brown (buerre noisette), and added my chops:

When you first put the chops into the pan, let them sit a minute before you try and move them about because you want them to form a nice golden crust. You should also hear a nice sizzle when you put the chops into the pan as it means the meat won't stick. After two minutes on the first side, I flipped them

and seared them for two additional minutes on the second side. I then removed the chops from the pan, transferred them to the small baking pan that came with the toaster oven, and simply put them into the toaster oven to finish cooking the rest of the way through, low and slow. If all you had was your regular oven, I would've simply put them into a 200 degree Fahrenheit pre-heated oven.
Next up were the Brussels sprouts. The method of cooking the sprouts was a combination steam / saute. First, I put the sprouts in my non-stick skillet which already had about 3/4 cup of boiling water in the bottom:

I slapped on the cover and steamed them for about 4-5 minutes until they were just a wee bit crunchy and looked like this:

Notice how the green color locked itself in after the steaming? I drained the water from the pan, added some extra virgin olive oil and a pat of butter and returned it to the burner. I then cranked the heat, which evaporated the rest of the water and began to saute the sprouts. To this I added salt and freshly cracked pepper to taste. To glaze them, I added a little bit of balsamic vinegar right at the end and tossed (or stirred) them around until the sugar in the vinegar began to caramelize slightly. The resulting sprouts aren't sweet, but have a nice balance between sweet and sour. If you don't have balsamic vinegar, you can use a different kind of vinegar, but I would add a bit of sugar to the pot, too.
The final component of our meal tonight, the pierogi, was the only remaining item to be completed. I started by placing the pierogi into the gently boiling water:

I adjusted the temperature under the pot so that the pierogi gently simmered in the hot water. If you boil them too hard, they have a tendency to break up. Once the pierogi floated, I removed them with a slotted spoon and put them into a temporary container in which I had placed a small piece of butter:

The butter served as a way to prevent the boiled dumplings from sticking to one another until I was ready to saute them. Having wiped out the stainless steel saute pan I used to sear the pork chops, I added a tablespoon of butter, let it melt and once the bubbling ceased and the butter solids turned a nice brown color (once you know what buerre noisette smells like, you don't even have to see it to know that you are at the right stage), I tossed in my boiled pierogi. Every few seconds, I would swirl the pan and flip the pierogi. It takes about 4 to 5 minutes to completely fry the pierogi to the right color and texture, but they were definitely worth it. The goal was to get the outer skin of the pierogi to be golden brown.
While I was working on putting the finishing touches on the main meal, my grandmother unmolded her cranberry Jello salad:

She took care of plating the salads while I plated the main meal. Each plate got a pork chop (or two), several pierogi, a scoop of the Brussels sprouts and a line of the freshly made green tomato salsa spooned over each chop:

Not to try too hard to pat myself on the back here, but damn, this was tasty! The acidity from the salsa worked wonderfully to cut through the fattiness of the seared pork chops. The Brussels sprouts were crisp-tender and the flavor from the caramelized balsamic vinegar added a nice flavor contrast to the slight bitterness from the sprouts. The pierogi were exactly as I had wanted them, crisp on the outside and creamy on the inside. I asked my grandmother what she thought and other than the pierogi, she thought everything was wonderful. It wasn't that she didn't like the pierogi, but this being her first one ever, I think I had pushed her food comfort zone in a new direction.
And the meal wouldn't be complete without a shot of my portion of cranberry Jello salad:

I won't say too much on the cranberry salad except to maybe point you to my previous commentary.
After dinner, we cleaned up the kitchen and gave ourselves a chance to digest before turning to dessert. Here was a shot of the label on the apple pie I had purchased at the market earlier:

I have been in love with Diane's pies since she first started baking them several years ago. Besides her commitment to using local Ohio fruit, her non-hydrogenated lard/butter crust is one of the best pie crusts I've tasted in a LONG time. I'll be the first to admit that her pies aren't cheap, but with the level of ingredients and the quality of the end product, I personally feel that they are worth paying that little bit extra. If you have a chance to get to the Howe Meadow market this summer, treat yourself to a delicious slice of heaven. The nice thing is that she will make you whatever kind of fruit pie you like and have it ready for you the following Saturday, as long as she has the fruit on hand to make it.
Okay, okay, enough promotional talk. Here was a shot of the entire pie:

While I normally would've taken a shot of my individual slice of pie, I didn't manage to get one before getting a bite or two into it. And then, I couldn't stop eating it until it was all gone. The crust was both flaky and tender and the apples were both tart and sweet. Diane likes to control the amount of sugar in her pies and this lets you taste more of the fruit and less of the sweet. The apples still had a nice little bit of texture to them as well. My grandmother opted for a scoop of ice cream with her piece, but I ate mine as it came.
Our dinner finally at an end, I packed up the leftovers to take home with me. It turned out that the salsa greatly benefited from an overnight sit in my refrigerator as I ate them the next day with tortilla chips. If you make nothing else from this posting, try the salsa. I greedily gobbled it up with the chips until it was gone. It is interesting to me that going into this dinner, I had such a preconceived notion that green tomatoes could only be prepared one way: fried. Today's little experiment proved to me that when life gives you green tomatoes, make salsa instead.
Knowing that I would be coming over the next day to cook my grandmother a meal, I loaded up on some goodies, green tomatoes, a homemade loaf of spelt bread from Ms. Julie's Kitchen, and a wonderful local Ohio apple pie from Humble Pie Baking Company owned and operated by a dear friend of mine, Diane Sikorski. Last year she was selling her pies at the North Union Farmer's Market on the campus of The Cleveland Clinic every Wednesday and I can tell you, she developed an amazing following. While Diane is a personal friend and that might taint my objectivity about her products, damn, if her pies aren't fantastic! That I now can get them every Saturday at a market much more local to me is a big plus in my book.
Originally I had thought of doing a simple fried treatment to the green tomatoes, but as soon as I loaded up my car and headed out of the market into the cool spring air, it immediately hit me: Grandma can't do seeds. And even though green tomatoes have smaller seeds than when they are fully ripe, seeds are still seeds. When I talked with my grandmother about our dinner plans, she indicated that she had some pork chops she needed to use up. Hmmm ... it sent my mind spinning for a little bit until I came up with turned out to be a very tasty solution. Tonight for dinner I would be making a panko crusted seared pork chop and top it with a green tomato salsa! Yes, that's it. I decided to wait until I got to the grocery store to see what else could inspire me.
The whole point of a salsa is to mix up the flavors a little bit; you want it a little sweet, a little sour, a little heat, and a lot of herbaceous cilantro flavor. With the discovery of an actual ripe mango in mid-May at the grocery store, here was the list of ingredients I assembled:

Starting in the rear and rotating clockwise, you have a single ripe mango, fresh cilantro, green tomatoes, a Jalapeno chile, three Persian limes and right in the middle was a Vidalia onion. Other than that, the only additional ingredients I used were salt and just a bit of honey to balance the acid from the lime juice. Here was the ratio of ingredients I used for the resulting green tomato mango salsa:
2 green tomatoes, seeded and diced finely
1/2 medium sweet onion, diced finely
3/4 mango, diced finely
1/2 Jalapeno, seeded, ribbed, and diced REAL finely
After pulling out my mad knife skills and trying my best to brunoise everything so that it was all the same size, I ended up with a bowl of finely chopped fruit and vegetables:

To this I added the juice from 1 1/2 limes, roughly 2 tablespoons of chopped cilantro (you can use the stems, too), sea salt, and just a touch of honey, maybe only 1 teaspoon or so, enough to cut through some of the acidity of the lime, but not enough to make it "sweet." Toss gently with a spoon to combine all of the ingredients. Taste and readjust as necessary. Since salsa really is a pretty straightforward dish, change the amounts of any of the ingredients to suit your taste.
Here was a picture of the salsa right before I covered it with a lid and it went into the refrigerator:

Next, I moved on to the fresh Brussels sprouts I had found at the supermarket. While they weren't local (being from Mexico), they did look fresh and enticing. Tonight I was going to do a sweet and sour Brussels sprouts treatment which involved steaming the halved sprouts in a bit of water, then pan searing in a combination of olive oil and butter and finishing off with a tossing in balsamic vinegar until the sugars in the vinegar caramelized and glazed the finished sprouts. Season with a little salt and freshly ground pepper, et voila!
Let's start with a shot of the ingredients required:

Here you see the two basics to any savory dish, salt and fresh pepper. In addition were the fresh Brussels sprouts, extra virgin olive oil, unsalted butter, and balsamic vinegar. First, I prepped the Brussels sprouts by cutting off the stem end and removing any extraneous outer leaves. Because these sprouts were fairly good sized, I cut each in half. Here was what I ended up with after prepping the above bag:

Having finished prepping the vegetable, I turned to my starch. My grandmother had originally suggested potatoes, but neither she nor I were feeling the love for potatoes tonight. So, when I went to the grocery store, I was looking around for an alternative when I came across these, Sophie's Choice Potato and Cheese Pierogi:

Sophie's Choice Pierogi is a local company based out of Garfield Heights and I have seen their pierogi in many Akron supermarkets. I had made pierogi for myself one other time before at my grandmother's condo and told her that I would make them for her the next time I had a chance. Well, today was the day. Being fully cooked, one can simply saute them in a bit of butter. Over the dozens of times I've made them, however, I tend to prefer the quick boil and then saute. This dual treatment renders them crispy on the outside and nice and creamy on the inside. Had I had any of the wonderful pierogi that Posh Pierogies sell at the Tremont Farmers Market, I would've gladly used those instead, although honestly, there is certainly nothing wrong with Sophie's brand.
Once I had all my ingredients prepped, I turned my attention to cooking equipment. My grandmother has a toaster oven that she uses primarily for toast. I, however, thought that it would be the perfect place to finish off the pork chops and keep them warm for service, freeing up the pan to saute my boiled pierogi. In addition, I wouldn't have to heat up her regular oven, keeping the kitchen cooler.

One thing to keep in mind though is that toaster ovens can vary wildly from what the thermostat is set at. Hers ran 50 degrees hotter than the setting on the dial, so I adjusted accordingly and set it to 150 degrees Fahrenheit.
On the stovetop tonight were three pots and pans:

On the back burner was a pot full of simmering water for the pierogi. On the front left was her non-stick skillet for the Brussels sprouts. The front right burner was for her stainless steel saute pan that I was going to be browning the pork chops and then sauteing the boiled pierogi.
Now that the food was prepped and the pans were placed, I turned my attention to the star of the plate, the pork chops. Here was a shot of them sitting on a paper towel, dried and ready to be breaded:

Note that I took the chops out of the refrigerator about thirty minutes before I needed them to let them come to room temperature. Next up was a shot of my breading station:

From left to right were all purpose flour, eggs, and Japanese panko dried bread crumbs. I really dig how well panko works as a coating for chicken and pork chops when sauteed in oil. To the flour and beaten eggs, I added a healthy pinch of salt and freshly cracked pepper which I stirred into each. The breading procedure, in case you've never done this before, consisted of dredging each chop through the flour, tapping to remove excess flour, then a dip in the beaten eggs, and finally placement in the panko bread crumbs where I made sure the entire surface was coated. The reason for all three is that the panko won't stick directly to the pork; the flour sticks to the meat, the egg sticks to the flour, and the panko sticks to the egg.
Here was a shot of the breaded pork chops:

Alright, time to get cooking! I put about two tablespoons of olive oil and a pat of butter into the saute pan, waited until the butter melted and went slightly brown (buerre noisette), and added my chops:

When you first put the chops into the pan, let them sit a minute before you try and move them about because you want them to form a nice golden crust. You should also hear a nice sizzle when you put the chops into the pan as it means the meat won't stick. After two minutes on the first side, I flipped them

and seared them for two additional minutes on the second side. I then removed the chops from the pan, transferred them to the small baking pan that came with the toaster oven, and simply put them into the toaster oven to finish cooking the rest of the way through, low and slow. If all you had was your regular oven, I would've simply put them into a 200 degree Fahrenheit pre-heated oven.
Next up were the Brussels sprouts. The method of cooking the sprouts was a combination steam / saute. First, I put the sprouts in my non-stick skillet which already had about 3/4 cup of boiling water in the bottom:

I slapped on the cover and steamed them for about 4-5 minutes until they were just a wee bit crunchy and looked like this:

Notice how the green color locked itself in after the steaming? I drained the water from the pan, added some extra virgin olive oil and a pat of butter and returned it to the burner. I then cranked the heat, which evaporated the rest of the water and began to saute the sprouts. To this I added salt and freshly cracked pepper to taste. To glaze them, I added a little bit of balsamic vinegar right at the end and tossed (or stirred) them around until the sugar in the vinegar began to caramelize slightly. The resulting sprouts aren't sweet, but have a nice balance between sweet and sour. If you don't have balsamic vinegar, you can use a different kind of vinegar, but I would add a bit of sugar to the pot, too.
The final component of our meal tonight, the pierogi, was the only remaining item to be completed. I started by placing the pierogi into the gently boiling water:

I adjusted the temperature under the pot so that the pierogi gently simmered in the hot water. If you boil them too hard, they have a tendency to break up. Once the pierogi floated, I removed them with a slotted spoon and put them into a temporary container in which I had placed a small piece of butter:

The butter served as a way to prevent the boiled dumplings from sticking to one another until I was ready to saute them. Having wiped out the stainless steel saute pan I used to sear the pork chops, I added a tablespoon of butter, let it melt and once the bubbling ceased and the butter solids turned a nice brown color (once you know what buerre noisette smells like, you don't even have to see it to know that you are at the right stage), I tossed in my boiled pierogi. Every few seconds, I would swirl the pan and flip the pierogi. It takes about 4 to 5 minutes to completely fry the pierogi to the right color and texture, but they were definitely worth it. The goal was to get the outer skin of the pierogi to be golden brown.
While I was working on putting the finishing touches on the main meal, my grandmother unmolded her cranberry Jello salad:

She took care of plating the salads while I plated the main meal. Each plate got a pork chop (or two), several pierogi, a scoop of the Brussels sprouts and a line of the freshly made green tomato salsa spooned over each chop:

Not to try too hard to pat myself on the back here, but damn, this was tasty! The acidity from the salsa worked wonderfully to cut through the fattiness of the seared pork chops. The Brussels sprouts were crisp-tender and the flavor from the caramelized balsamic vinegar added a nice flavor contrast to the slight bitterness from the sprouts. The pierogi were exactly as I had wanted them, crisp on the outside and creamy on the inside. I asked my grandmother what she thought and other than the pierogi, she thought everything was wonderful. It wasn't that she didn't like the pierogi, but this being her first one ever, I think I had pushed her food comfort zone in a new direction.
And the meal wouldn't be complete without a shot of my portion of cranberry Jello salad:

I won't say too much on the cranberry salad except to maybe point you to my previous commentary.
After dinner, we cleaned up the kitchen and gave ourselves a chance to digest before turning to dessert. Here was a shot of the label on the apple pie I had purchased at the market earlier:
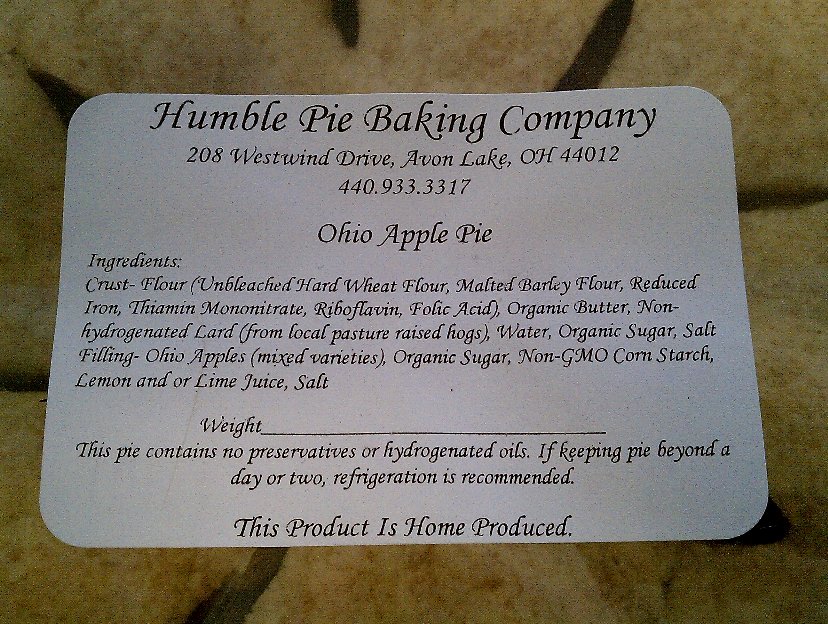
I have been in love with Diane's pies since she first started baking them several years ago. Besides her commitment to using local Ohio fruit, her non-hydrogenated lard/butter crust is one of the best pie crusts I've tasted in a LONG time. I'll be the first to admit that her pies aren't cheap, but with the level of ingredients and the quality of the end product, I personally feel that they are worth paying that little bit extra. If you have a chance to get to the Howe Meadow market this summer, treat yourself to a delicious slice of heaven. The nice thing is that she will make you whatever kind of fruit pie you like and have it ready for you the following Saturday, as long as she has the fruit on hand to make it.
Okay, okay, enough promotional talk. Here was a shot of the entire pie:

While I normally would've taken a shot of my individual slice of pie, I didn't manage to get one before getting a bite or two into it. And then, I couldn't stop eating it until it was all gone. The crust was both flaky and tender and the apples were both tart and sweet. Diane likes to control the amount of sugar in her pies and this lets you taste more of the fruit and less of the sweet. The apples still had a nice little bit of texture to them as well. My grandmother opted for a scoop of ice cream with her piece, but I ate mine as it came.
Our dinner finally at an end, I packed up the leftovers to take home with me. It turned out that the salsa greatly benefited from an overnight sit in my refrigerator as I ate them the next day with tortilla chips. If you make nothing else from this posting, try the salsa. I greedily gobbled it up with the chips until it was gone. It is interesting to me that going into this dinner, I had such a preconceived notion that green tomatoes could only be prepared one way: fried. Today's little experiment proved to me that when life gives you green tomatoes, make salsa instead.
Subscribe to:
Posts (Atom)
