Showing posts with label potato and cheese pierogi. Show all posts

Saturday, March 5, 2011

Lenten Project 2010: Winning Pierogi Recipe, Pt. II

Welcome back, gentle reader, to the grand epic tale of how the pierogi making team at St. Joan of Arc Catholic church in Streetsboro, Ohio, delighted my taste buds and claimed the title of best fish fry during the 2010 Lenten Project. In the first installment, I discussed the ingredients involved in making the potato and cheese pierogi as well as step by step instructions on making the dough and the filling. In today's follow up, you will see how to form the pierogi, how to cook them, and how to bag them up for storage until you need them.

Turning our attention back to the finished ball of dough sitting underneath the inverted plastic bowl, one of the helpers removed it and began portioning off smaller pieces using a serrated knife:
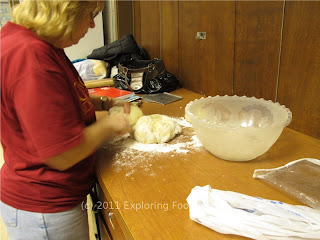
Cutting the Dough Into Smaller Pieces
The one large ball of dough was divided into five or six smaller pieces, and each was rolled up into a smooth ball:

Forming Smaller Dough Balls
Once the dough balls were rolled out, they were again placed underneath the inverted bowl and allowed to rest:

Resting the Finished Dough Balls
This resting period, roughly ten to fifteen minutes, allowed the gluten in the flour to relax and make the next step, rolling, much, much easier. With the initial balls now resting, the gentleman donning the rolling pin for the evening, prepared his work surface win a generous dusting of flour:
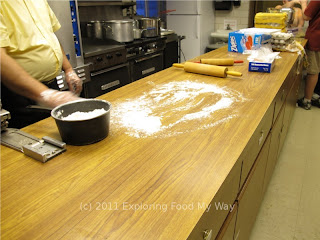
Flouring the Table
Soon enough, the balls were being removed from the bowl one at a time and rolled to a thickness of between 1/8 and 1/4 inches thick:

Rolling the Pierogi Dough
Because the pierogi served at St. Joan of Arc were so large, you don't want to roll the dough too thin or it may break up when you go to boil it. Were the pierogi more average size, you could get away with rolling the dough thinner.

Next up, the cutter. While the cutter looked homemade, the crew insisted that they had actually found them online:

Cutting Pierogi Rounds
Between the pristinely rolled dough balls and the scraps, each batch of pierogi dough that I posted in the previous post should get you about twenty-four of these large dumplings. With a smaller sized pierogi, you could easily get 50% more, say about thirty-six per batch.

The next step is to take a dough round and gently stretch it around the edges:

Stretching the Dough
Where one person stretched between the fingertips, another tended to flatten the dough round between her palms. As I began watching the three women forming the pierogi, I realized that while the end result was the same, the process of getting there varied a little. And that's okay.

Once the dough round has been flatted, they took the round in one hand

Preparing to Fill the Pierogi
and spooned some of the filling into the center. Alternatively, you could place the dough round on the board, take some of the filling into your palm and roll it into a golf ball-sized shape and then place it on top of the dough:
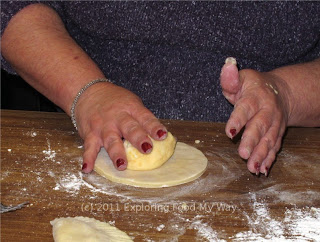
Placing Filling into the Dough
Using both hands, grab the opposite edge of the dough and fold it over the filling, so that the edges line up:
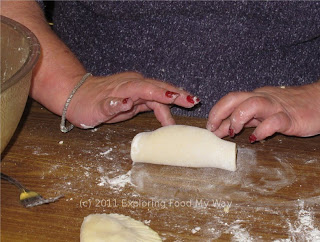
Folding the Dough Over
Using your fingertips, work your way from the center out towards the edges, pressing out all of the air and sealing the dough. Finally, to ensure an excellent seal, use the tines of the fork to crimp the edges together, first on the top and then on the bottom:

Crimping the Edges
Up until this point, I had been busy trying to absorb as much information and take as many photographs as possible so that I could write up an accurate article about my experience. As I finished photographing the pierogi forming process,

Finished Pierogi!
I began to relax a little bit and started to observe what I think drives this merry band of volunteers to do this labor of love year after year: love of camaraderie, love of food, and the love of keeping this tradition alive and well. Stories were told, laughs were shared, and a real communal sense of a singular shared purpose seemed to envelop the tiny group. Had I not been there in order to document the process, I honestly felt like I would have been right at home rolling up my own sleeves and pitching in, forming tray after tray of pierogi. Was this whole process time consuming? Absolutely. Could you get the same experience from a box of frozen Mrs. T's Pierogis? Absolutely not!

Snapping out of my reverie, I realized that there were still a few remaining steps left. Since the pierogi had undergone their transformation from dough and filling to finished dumplings, Leanne's husband Joe stepped up and proceeded with the next step, cooking:

Waiting Pots of Boiling Water
With four pots of water going on the stove, he could cook between sixteen and twenty pierogi at once. Leanne and I talked about this step quite a bit. She agreed with me that most fresh pasta or dumplings should be frozen in their "raw" state and then boiled to order when needed. Because her pierogi were so large, however, when she tried that in the pasta, the flour in the dumpling's dough still had a bit of a raw taste to it that never seemed to cook out. So, instead, she parboils the pierogi, chills and freezes them for storage, and then finished the cooking process on the griddle in lots of butter and fried onions.

Here was a shot of the pierogi going into the boiling water:

Dropping Pierogi into Boiling Water
The pierogi are cooked for a few minutes longer than after they start to float:

Floating Pierogi
When I asked Leanne how long to cook them after they start floating, she grinned at me and impishly replied, "Until they're done!"

Here was a shot of the finished pierogi, parboiled and cooling on a sheet pan:

Cooling Pierogi on a Sheetpan
It was at this point that a cross breeze from an open window helped to cool these quickly so that they could be bagged, tagged, and placed in long-term freezer storage until prime Lenten fish fry season.

Once cooled, the pierogi were placed in freezer zip bags,

Bagging Cooled Pierogi
labeled, and packaged up in a box for transfer to the freezer:

Bagged and Labeled Pierogi
If you look closely at the label on the bag, it said, "PTC". When I asked what "PTC" meant, "potato and cheese" was the answer I received. I quizzically looked at the young man doing the labeling and asked, "What does the 'T' stand for?" It turned out that it was supposed to read "P+C" and the young man writing on the bags had thought that the plus sign was actually a T. He turned a slight crimson as we all laughed.

Finally, after I had taken all of the pictures I would need for my write-up, it turned out I needed my camera for just two more shots. The first picture was of a finished pierogi, all for myself (yeah for me!):
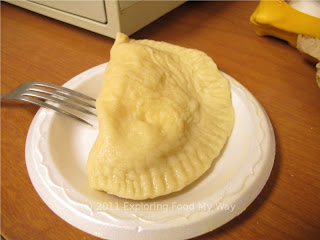
My Very Own Pierogi
As you can see, these suckers are enormous! The plate on which it sits was one of the standard Styrofoam plates used for side dishes. While today's taste hadn't been finished in butter and grilled onions, I quickly dug in. After several forkfuls, I stopped to take a filling shot:
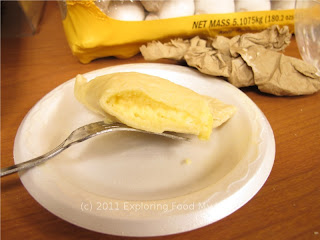
Potato and Cheese Filling
Piping hot, the filling was a combination of creamy, cheesy, and a tad bit sweet from the onions. Interestingly, the onions still had a bit of texture to them. Based on my memory of my previous meal at St. Joan of Arc, I didn't remember the crunch from the onion. When I asked Leanne, she explained that during the second cooking right before the actual dinner service, the onions fully soften up. Additionally, the freezing of the pierogi help to break down the onion flesh. She also mentioned that the perfect way to cook the pierogi was to wait until they were halfway thawed and then throw them directly onto the griddle to get some color and fully cook. Since they had already been boiled once, they didn't need a second dunking in boiling water. With results like what I had eaten before, who was I to argue?

By the time I had finished photographing, interviewing, and eating my way through the pierogi making process, I realized that I had spent nearly two and a half hours at the church. While the session had started off a little chaotic, in the end this intrepid little band of dumpling makers had me wishing I could come back the following week and help them through their next dozen batches of pierogi. While I am sad to have to exclude them from this year's judging because of their win last year, I am looking forward to attending their church's fish fry on the last Friday before Lent ends.

Now that I've spent the last two posts talking about their pierogi, hopefully I have piqued your interest in trying them for yourself. St. Joan of Arc Catholic Church is located at 8894 Ohio Route 14, Streetsboro, OH 44241 and can be reached at 330-626-3424. Friday fish fry dinners start on Friday, March 11th and I suggest that if you're looking for an excellent overall meal that you stop in during Lent and check them out. Congratulations to Leanne, her crew, and her church and I wish them the best of luck throughout the year.

Friday, March 4, 2011

Lenten Project 2010: Winning Pierogi Recipe, Pt. I

For last year's Lenten Project, while I announced the winner here on the blog, I never bothered to contact any of the organizations I had selected to judge during the Friday night fish fries I had attended. For one thing, I figured that a dinky little food blog didn't really have all that much credibility and I worried that people would think I was full of myself. Second, since the Lenten Project was done more for myself and my readers than the organizations themselves, they weren't really going to benefit as much from my, um, "research" as you would.

Surprisingly, back in July of 2010, I received an email from Leanne, who not only had been part of one of the churches on my fish and pierogi odyssey during Lent in 2010, but also from the winning church, St. Joan of Arc in Streetsboro. A friend of hers had come across my blog entry and sent the link to Leanne, who was simply shocked that someone had not only written about her food, but also proclaimed that her church had placed first, above seven other organizations. We exchanged several emails over the next couple of days and promised to keep in touch.

As 2010 came to a close, I was still trying to decide what I wanted I wanted to do for this year's installment of the Lenten Project. I decided that since St. Joan of Arc had won in 2010, they wouldn't be eligible for judging. However, wanting to promote them as the previous year's winner, I contacted Leanne once again and told her of my idea and suggested that I do a write-up of her homemade pierogi recipe and run it a week before the first fish fry dinners start on March 11th. She thought this was a fabulous idea and invited me to the first (of many) pierogi making sessions all the way back on Tuesday, January 11th, 2011.

On a very cold and blistery day, I met up with Leanne, her daughter, husband, and friends in the kitchen of the exact same building where the fish fry was served to me roughly ten months prior. After getting my camera set up, I got down to the business of photodocumenting the entire process, from ingredients all the way to storage and labeling. Because of the number of photographs taken, it was necessary to split this post into two parts. Today's entry is all about the ingredients and making the pierogi dough and filling. Tomorrow's entry will be about forming the pierogi, cooking them, and then storing them for later use.

First up, a table full of the ingredients required for today's session:

Table full of pierogi making ingredients
Going down the line, we have onions:

Onions
A case of potato flakes:

Boxes of Potato Flakes
Two five pound bags of shredded cheddar cheese:

Large Bags of Shredded Cheddar Cheese
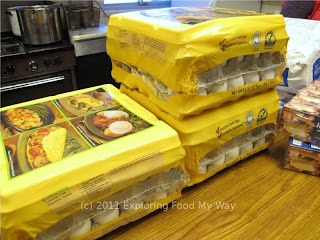
Many dozens of eggs:

Dozens of Eggs
Multiple boxes of salted butter (each box was four sticks which was equivalent to one pound of butter):

One Pound Boxes of Salted Butter
And at the other end of the table were the shiny Hobart stand mixer and several bags of all-purpose (AP) flour:

Hobart Floor Mixer and Large Bags of All-Purpose (AP) Flour
Now that you've met the main players involved in today's line-up, it's time to get down to business. For the dough, you will need:

8 cups of flour
10 eggs
2 cups of water
pinch of salt

First, crack the eggs into a bowl to ensure that you don't get any bad ones or shells:

Cracking Eggs
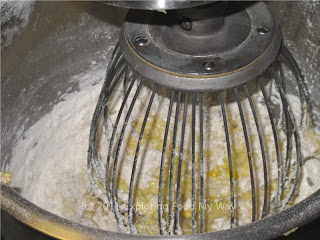
After adding the eggs to the flour, water, and salt, turn on the mixer on LOW:

Mixing the Dough on Low Speed
While the group was originally looking for the dough hook to mix and knead this, when they couldn't find it, they had to resort to the whip attachment. I was skeptical at first, but they continued to turn out batch after batch of successful pierogi dough.

When the dough began to come together and hydrate, it turned into this:

Mixed and Hydrated Dough
The dough was taken out of the large mixing bowl and placed into a smaller plastic bowl where it was further kneaded by pulling on the dough:

Kneading the Dough by Pulling It
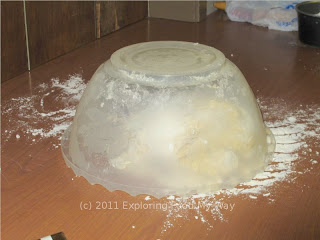
When the dough was nice and elastic, it was shaped into a ball, placed on a floured counter to rest, and covered with the inverted plastic bowl to prevent the dough from drying out:

Finished Dough Resting
Next up, we turn our attention to the filling. While today's goal was to make twelve dozen potato and cheese pierogi, on other weeks, Leanne and her group could be making mushroom and cheese, broccoli and cheese, or their newest addition, dessert pierogi. The number of pierogi needed to make it though all six dinners in Lent astounded me, but given how good they were, it didn't surprise me all that much.

For the potato and cheese filling today, the recipe consisted of:

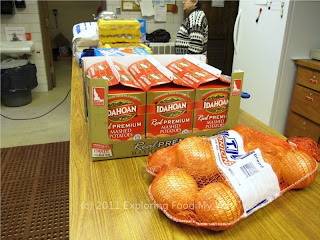
1 box of Idahoan Potato Flakes
1 3/4 quarts of hot tap water
2 to 2 1/2 pounds of shredded Cheddar cheese
Softened onions and butter to taste
Ground pepper to taste

The first step was to chop the onions fairly finely:

Chopped Onions
Once enough onions had been chopped to fill the Windsor sauce pan,

Cooking Onions in Windsor Pan
several sticks of butter were added to the pot and the whole thing put over heat to gently simmer away until the onions were translucent and softened:

Softened and Cooked Onions in Butter
It's important to note that while the onions had softened considerably, they weren't complete mush at this point and still had a bit of resistance when eaten. In a very large bowl, Leanne emptied the entire box of potato flakes:

Bowl of Potato Flakes
It was at this point she stopped for a second to explain that while she actually uses potatoes when she makes these at home, when you are cooking for such a large crowd over an extended period of time such as Lent, certain shortcuts needed to be employed, especially when they make sense in terms of time or money. While she had used real potatoes the first couple of years she made the pierogi for the fish fries at the church, when she discovered this time saver and ran several secret taste tests on both her family and others without anyone discovering it, she knew she had a winner on her hands. Besides eliminating the time heavy step of baking and peeling the potatoes, because she was starting with a completely dried product, she could exactly control the moisture content of the finished filling.

To the potato flakes, Leanne added somewhere between two and two-and-a-half pounds of shredded Cheddar cheese:

Potato Flakes and Cheddar Cheese
Next up were several large ladles of the cooked onions and butter:

Adding in the Onions and the Butter
And finally, a generous addition of ground black pepper and one and three-quarters quarts of hot tap water:

Black Pepper and Hot Water Are Added
At this point, a large metal spoon and some elbow grease were required to hydrate and mix all of the ingredients:

Combining the Filling
Once the ingredients were thoroughly combined, she and I both tasted the mixture for proper saltiness. Having added nothing salty to the mix except the Cheddar cheese and the salted butter, it turned out to be salty enough to properly season the entire mix. The filling itself was fairly dry and stiff, a necessity for any kind of filled dumpling that was to be boiled or fried. If the filling was too loose, it would run all over the place when cut or bit into.

Alright, dough and filling have now been made. While up to this point, there had been six people working on prepping ingredients, the environment had felt a little unstructured at times. However, once the dough rolling and pierogi making commenced, Leanne and her pierogi making team fell into a groove and began to crank out trayfuls of these doughy Polish treats. Come back tomorrow in order to find out just how they finish these up and I will have the opportunity to taste the finished product for the first time since last March. I know I'm looking forward to it.
Related Posts with Thumbnails