Turning our attention back to the finished ball of dough sitting underneath the inverted plastic bowl, one of the helpers removed it and began portioning off smaller pieces using a serrated knife:
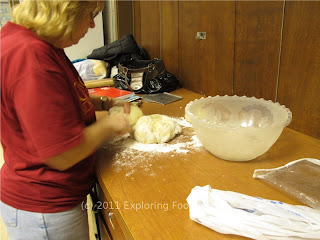
The one large ball of dough was divided into five or six smaller pieces, and each was rolled up into a smooth ball:

Once the dough balls were rolled out, they were again placed underneath the inverted bowl and allowed to rest:

This resting period, roughly ten to fifteen minutes, allowed the gluten in the flour to relax and make the next step, rolling, much, much easier. With the initial balls now resting, the gentleman donning the rolling pin for the evening, prepared his work surface win a generous dusting of flour:
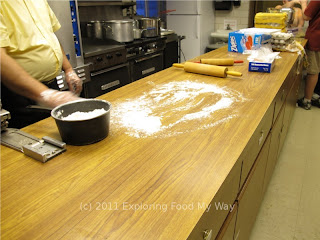
Soon enough, the balls were being removed from the bowl one at a time and rolled to a thickness of between 1/8 and 1/4 inches thick:

Because the pierogi served at St. Joan of Arc were so large, you don't want to roll the dough too thin or it may break up when you go to boil it. Were the pierogi more average size, you could get away with rolling the dough thinner.
Next up, the cutter. While the cutter looked homemade, the crew insisted that they had actually found them online:

Between the pristinely rolled dough balls and the scraps, each batch of pierogi dough that I posted in the previous post should get you about twenty-four of these large dumplings. With a smaller sized pierogi, you could easily get 50% more, say about thirty-six per batch.
The next step is to take a dough round and gently stretch it around the edges:

Where one person stretched between the fingertips, another tended to flatten the dough round between her palms. As I began watching the three women forming the pierogi, I realized that while the end result was the same, the process of getting there varied a little. And that's okay.
Once the dough round has been flatted, they took the round in one hand

and spooned some of the filling into the center. Alternatively, you could place the dough round on the board, take some of the filling into your palm and roll it into a golf ball-sized shape and then place it on top of the dough:
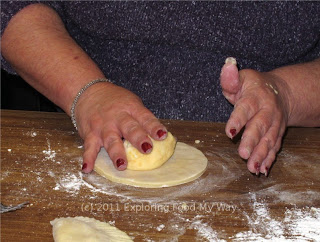
Using both hands, grab the opposite edge of the dough and fold it over the filling, so that the edges line up:
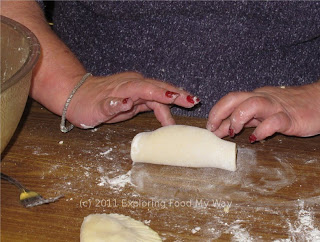
Using your fingertips, work your way from the center out towards the edges, pressing out all of the air and sealing the dough. Finally, to ensure an excellent seal, use the tines of the fork to crimp the edges together, first on the top and then on the bottom:

Up until this point, I had been busy trying to absorb as much information and take as many photographs as possible so that I could write up an accurate article about my experience. As I finished photographing the pierogi forming process,

I began to relax a little bit and started to observe what I think drives this merry band of volunteers to do this labor of love year after year: love of camaraderie, love of food, and the love of keeping this tradition alive and well. Stories were told, laughs were shared, and a real communal sense of a singular shared purpose seemed to envelop the tiny group. Had I not been there in order to document the process, I honestly felt like I would have been right at home rolling up my own sleeves and pitching in, forming tray after tray of pierogi. Was this whole process time consuming? Absolutely. Could you get the same experience from a box of frozen Mrs. T's Pierogis? Absolutely not!
Snapping out of my reverie, I realized that there were still a few remaining steps left. Since the pierogi had undergone their transformation from dough and filling to finished dumplings, Leanne's husband Joe stepped up and proceeded with the next step, cooking:

With four pots of water going on the stove, he could cook between sixteen and twenty pierogi at once. Leanne and I talked about this step quite a bit. She agreed with me that most fresh pasta or dumplings should be frozen in their "raw" state and then boiled to order when needed. Because her pierogi were so large, however, when she tried that in the pasta, the flour in the dumpling's dough still had a bit of a raw taste to it that never seemed to cook out. So, instead, she parboils the pierogi, chills and freezes them for storage, and then finished the cooking process on the griddle in lots of butter and fried onions.
Here was a shot of the pierogi going into the boiling water:

The pierogi are cooked for a few minutes longer than after they start to float:

When I asked Leanne how long to cook them after they start floating, she grinned at me and impishly replied, "Until they're done!"
Here was a shot of the finished pierogi, parboiled and cooling on a sheet pan:

It was at this point that a cross breeze from an open window helped to cool these quickly so that they could be bagged, tagged, and placed in long-term freezer storage until prime Lenten fish fry season.
Once cooled, the pierogi were placed in freezer zip bags,

labeled, and packaged up in a box for transfer to the freezer:

If you look closely at the label on the bag, it said, "PTC". When I asked what "PTC" meant, "potato and cheese" was the answer I received. I quizzically looked at the young man doing the labeling and asked, "What does the 'T' stand for?" It turned out that it was supposed to read "P+C" and the young man writing on the bags had thought that the plus sign was actually a T. He turned a slight crimson as we all laughed.
Finally, after I had taken all of the pictures I would need for my write-up, it turned out I needed my camera for just two more shots. The first picture was of a finished pierogi, all for myself (yeah for me!):
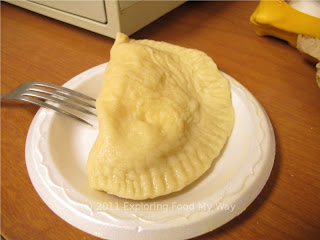
As you can see, these suckers are enormous! The plate on which it sits was one of the standard Styrofoam plates used for side dishes. While today's taste hadn't been finished in butter and grilled onions, I quickly dug in. After several forkfuls, I stopped to take a filling shot:
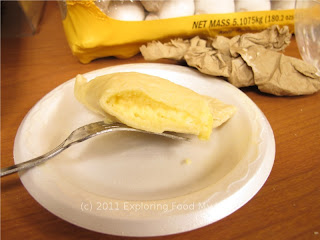
Piping hot, the filling was a combination of creamy, cheesy, and a tad bit sweet from the onions. Interestingly, the onions still had a bit of texture to them. Based on my memory of my previous meal at St. Joan of Arc, I didn't remember the crunch from the onion. When I asked Leanne, she explained that during the second cooking right before the actual dinner service, the onions fully soften up. Additionally, the freezing of the pierogi help to break down the onion flesh. She also mentioned that the perfect way to cook the pierogi was to wait until they were halfway thawed and then throw them directly onto the griddle to get some color and fully cook. Since they had already been boiled once, they didn't need a second dunking in boiling water. With results like what I had eaten before, who was I to argue?
By the time I had finished photographing, interviewing, and eating my way through the pierogi making process, I realized that I had spent nearly two and a half hours at the church. While the session had started off a little chaotic, in the end this intrepid little band of dumpling makers had me wishing I could come back the following week and help them through their next dozen batches of pierogi. While I am sad to have to exclude them from this year's judging because of their win last year, I am looking forward to attending their church's fish fry on the last Friday before Lent ends.
Now that I've spent the last two posts talking about their pierogi, hopefully I have piqued your interest in trying them for yourself. St. Joan of Arc Catholic Church is located at 8894 Ohio Route 14, Streetsboro, OH 44241 and can be reached at 330-626-3424. Friday fish fry dinners start on Friday, March 11th and I suggest that if you're looking for an excellent overall meal that you stop in during Lent and check them out. Congratulations to Leanne, her crew, and her church and I wish them the best of luck throughout the year.

2 comments:
I have been wanting to make pierogies for many years and maybe 2011 will be my year to try it! Off he subject, I won a gift certificate from you to Amp 150 last year and finally got around to using it last night. It was amazing. I am willing to drive there from the east side to try it again! Thank you!
@Bonnie K: Awesome, so glad you finally got around to getting to try AMP 150! And let me know how your attempt at pierogi making goes. I'm eager to hear.
Post a Comment