When writing something as public as a blog, you hope that your work will be easily found by others looking for the kinds of topics on which you write. For the most part, with time, this works well. Unfortunately, the downside of being "out there" is that sometimes you get mindlessly added to email groups to which you really don't belong. Several months ago, I started receiving email announcements from a public relations firm called JS Public Relations. Every now and again, I'd get an email telling me about their latest promotion or the hot new item that apparently I was supposed to "sell" to my readers. I was even addressed by the title of "editor," which technically I suppose is true, but gives me far more credibility than I deserve.
For the most part when I received these messages, I chuckled and simply deleted them. On Friday, however, I received an announcement that was so ludicrous that I knew it was time to break the silence. What follows is the correspondence between myself and JS Public Relations:
Initial Email:
June 24, 2011
Dear Editor:
New for this season, and perfectly timed for summer and fall cooking, entertaining and gifting is Rachael Ray's iconic Garbage Bowl in speckled Green, Orange, Red, Purple and Blue.*
Rachael is steadfast in her belief that cooking should be fun and easy. One of her best-known tips is to place a "garbage bowl" by your cutting board for handy and time saving disposal of vegetable peels and food scraps that accumulate during food prep.
Rachael's new Garbage Bowl has myriad advantages over other kitchen bowls for collecting food scraps. Constructed of durable yet lightweight melamine, the generously sized, 3-quart capacity Garbage Bowl is never too heavy to lift, and can be easily cleaned by hand or in the dishwasher. The retro speckled design hides unsightly peels and other scraps - always nice when guests are gathering in the kitchen - and a rubberized base keeps it from skidding off counters or tables. In the event the Garbage Bowl drops to the floor, it won't break.
Also, for cooks who are growing vegetables and composting this summer, the Garbage Bowl provides an aesthetically pleasing way to carry food scraps from the kitchen to the garden.
Available now at retail nationwide and at www.potsandpans.com, the new Rachael Ray Garbage Bowl is priced at $19.99 suggested retail. (*The Blue version will be arriving soon.)
Photos can be accessed at www.meyer.com, US Site, Press Desk. ID: press, Password: images, folder: Rachael Ray. Please contact us to request product sample for review or photography, and for assistance with any questions.
Best regards,
Julia Stambules
Principal
JS Public Relations
Keith Sivera
Account Executive
JS Public Relations
My Response:
Okay ...
I've been getting these annoying announcements from you for a while, but this one really does take the cake.
You honestly expect me to try and "sell" this?
It's a f------ bowl. Get real.
Interestingly, I got a response:
Thomas,
We’re removing your name from my mailing list. Sorry for the annoyance.
Julia
-----------------
In case you were wondering, I didn't censor the word "f------" in my email response. And it felt awfully good not to.

Monday, June 27, 2011


Friday, June 24, 2011
Kitchen Challenge: Hard-Boiled Eggs, Part IV and Conclusion
Here we are, gentle reader: the fourth and final week of the Grand Egg Experiment!
Over the past three weeks, we have walked the path together on the journey to hard-boiled egg enlightenment. So far, I've discovered that the method of making hard-boiled eggs that I've been using for the last two decades can definitely be improved upon. With the conclusion of this fourth week of testing, not only will I be able to draw conclusions about the three experimental methods I've selected, but I will also be able to look at the results over time, thus adding a fourth dimension to the experiment. If you remember from the original post, I was led to believe that older eggs made easier-to-peel eggs once they were hard-boiled. We'll finally get to put that premise to rest.
Two interesting items I've picked up on over the last four weeks are this: the shells feel more fragile, the older the egg, and the airspace at the wider end of the egg gets larger, the older the egg. Now, you may very well already know this, but for the sake of creating pleasant looking eggs for dishes such as Deviled Eggs, it's good to keep this in mind if you're looking for the perfectly shaped hard-boiled egg, too. Hopefully, as a result of my experiment, you'll be able to get perfectly peel-able and visually perfect eggs, no matter how old they are.
Without further ado, here are the results of week number four:
Control Group
6 cups of cold tap water
Time to come to boil: 11 minutes, 58 seconds
Time boiling: 1 min
Time sitting off heat: 11 minutes
Time cooled under cold water: 3 minutes
Control group ratings:
* Ease of peeling: 8
* Outer appearance: 8
* Texture: 10
* Taste: 10
Two of the eggs peeled like a complete dream, but the third one, which also brought down the appearance score, was a touch difficult, but not nearly as difficult as any of the other week's control groups. I should also mention that one of today's control group eggs actually cracked during the boiling process. While the gentle boil for one minute did nothing to make it any worse, this is significant to note since the eggshells over the four week test period have seemed to get thinner over time. This might pricking the end of the egg (no matter which method you use) make sense as it would relieve the air pressure and not cause the egg's shell to crack further.

Commercial Egg Cooker
Time in the egg cooker: ~17 minutes
Time cooled under cold water: 3 minutes
Water adjustment: - 1/2 tablespoon
Commercial Egg Cooker ratings:
* Ease of peeling: 10
* Outer appearance: 10
* Texture: 9
* Taste: 10
What can I say about the peeling and appearance of the Cuisinart Egg Cooker? It has been nearly flawless over the past four weeks. As impressive as that it, it isn't surprising. Cuisinart is a pretty solid brand and I would hope they wouldn't put out a uni-tasker device without it doing its one job nearly perfectly. The only two downsides I see to the egg cooker are the fact that you can only do seven eggs at once and I can get a slightly more tender egg when I do them using one of the other methods (in fact, ALL of the other methods) that I've been trying these past four weeks. That being said, the "set it and forget it" mentality certainly makes this device hugely desirable in many peoples' eyes.

Baking Soda In The Water
6 cups of cold tap water
1 teaspoon Arm & Hammer baking soda (sodium bicarbonate)
Time to come to boil: 11 minutes, 35 seconds
Time boiling: 1 min
Time sitting off heat: 11 minutes
Time cooled under cold water: 3 minutes
Baking Soda In The Water group ratings:
* Ease of peeling: 9
* Outer appearance: 9
* Texture: 10
* Taste: 10
The baking soda eggs this week were just shy of being a perfect peel and a perfect appearance. Overall, this method has done quite well, but other than the first week, has never achieved a consistently perfect score. That being said, the technique of adding a level teaspoon of baking soda to six cups of cold water drastically improves (at least when the eggs are fresher) the likelihood of easy-to-peel and easy-on-the-eyes hard-boiled eggs.

Salt In The Water and Egg Pricked
6 cups of cold tap water
2 tablespoons kosher salt (sodium chloride)
Time to come to boil: 11 minutes, 40 seconds
Time boiling: 1 min
Time sitting off heat: 11 minutes
Time cooled under cold water: 3 minutes
Salt In The Water and Egg Pricked group ratings:
* Ease of peeling: 10
* Outer appearance: 10
* Texture: 10
* Taste: 10
Interestingly, the "Salt & Prick" method has proven to be easy to peel from the beginning and nothing has changed this week. For the past three weeks, it has also yielded perfect-appearance eggs as well. This week, while I did give the appearance a 10, there was a notable blemish on one of the eggs; however, after checking the egg shell for signs of cooked egg white and discovering none, I determined that the blemish was caused by the age of the egg, rather than the white being peeled away with the egg shell. While I expected the air gap at the larger end of the egg to grow over time, I hadn't expected other areas of the egg to also show this feature.

So what is the great conclusion to all of this? If you want consistent results without having to worry about how they are cooked or for how long, go out and buy yourself a Cuisinart Egg Cooker. While you may have to tweak the amount of distilled water you add in order to get perfectly peel-able and delectable eggs, in the end, it does take all the guesswork out of the equation. If you don't want to waste $30 and wish to get great results out of the pan you already own, might I suggest the "salt & prick" method? I consulted with my friend and high school science teacher, Amy Waldfogle, who suggested this technique. Upon asking her why this method would work so well, she responded:
"what the salt does is it makes the water you're boiling in hypertonic to the solution in the eggs, which causes some of the water inside the egg membrane to leave - that shrinks the egg a little bit, separating it from the inside of the shell ... same thing that happens when the egg is older - it dehydrates a little"
and
"the inner shell membrane is 'selectively permeable' - that means some things (small molecules, things that are neutral) can pass through but others (big things, things with charges) can't. Salt (sodium chloride) and baking soda (sodium bicarbonate) are ionic compounds that dissociate when they dissolve in water - that means they become a bunch of ions floating around - they won't pass through the membrane"
and as a result
"water will move out of the egg into the pot because the natural order of things (entropy) favors equilibrium - everything having the same concentration - so since water is the only thing involved that can travel across the membrane, the egg will dehydrate"
So why prick the egg, too? In addition to allowing the air pressure to equalize inside and outside the egg (which prevents the egg from cracking during cooking), this also allows water to move into the egg during the cooking process and further separate the membrane from the shell. It's the same reason that the egg cooker (via steam) works so well, if slightly less effective.
So, there you have it. If you don't want to go out and buy yourself a dedicated egg cooker, simply prick the larger end of your eggs and add two tablespoons of kosher salt for every six cups of water in your pot. Interestingly, since the membrane in the egg only allows water to move back and forth, the salt in the water does not make the eggs salty, like it would with cooking pasta. Thus, if concerns about sodium intake are an issue, you can put those aside. In terms of the age of the eggs and how that affected the peeling results, generally, as the got older, they did become easier to peel (the control group at least). The second week was definitely a real pain to peel, and based on the original dozen that gave me such a hard time, I don't think that age is a definite indicator of success.
I hope this experiment has been as fun for you as it has been for me. Here's to many successful, easy-to-peel hard-boiled eggs!
Over the past three weeks, we have walked the path together on the journey to hard-boiled egg enlightenment. So far, I've discovered that the method of making hard-boiled eggs that I've been using for the last two decades can definitely be improved upon. With the conclusion of this fourth week of testing, not only will I be able to draw conclusions about the three experimental methods I've selected, but I will also be able to look at the results over time, thus adding a fourth dimension to the experiment. If you remember from the original post, I was led to believe that older eggs made easier-to-peel eggs once they were hard-boiled. We'll finally get to put that premise to rest.
Two interesting items I've picked up on over the last four weeks are this: the shells feel more fragile, the older the egg, and the airspace at the wider end of the egg gets larger, the older the egg. Now, you may very well already know this, but for the sake of creating pleasant looking eggs for dishes such as Deviled Eggs, it's good to keep this in mind if you're looking for the perfectly shaped hard-boiled egg, too. Hopefully, as a result of my experiment, you'll be able to get perfectly peel-able and visually perfect eggs, no matter how old they are.
Without further ado, here are the results of week number four:
Control Group
6 cups of cold tap water
Time to come to boil: 11 minutes, 58 seconds
Time boiling: 1 min
Time sitting off heat: 11 minutes
Time cooled under cold water: 3 minutes
Control group ratings:
* Ease of peeling: 8
* Outer appearance: 8
* Texture: 10
* Taste: 10
Two of the eggs peeled like a complete dream, but the third one, which also brought down the appearance score, was a touch difficult, but not nearly as difficult as any of the other week's control groups. I should also mention that one of today's control group eggs actually cracked during the boiling process. While the gentle boil for one minute did nothing to make it any worse, this is significant to note since the eggshells over the four week test period have seemed to get thinner over time. This might pricking the end of the egg (no matter which method you use) make sense as it would relieve the air pressure and not cause the egg's shell to crack further.

Commercial Egg Cooker
Time in the egg cooker: ~17 minutes
Time cooled under cold water: 3 minutes
Water adjustment: - 1/2 tablespoon
Commercial Egg Cooker ratings:
* Ease of peeling: 10
* Outer appearance: 10
* Texture: 9
* Taste: 10
What can I say about the peeling and appearance of the Cuisinart Egg Cooker? It has been nearly flawless over the past four weeks. As impressive as that it, it isn't surprising. Cuisinart is a pretty solid brand and I would hope they wouldn't put out a uni-tasker device without it doing its one job nearly perfectly. The only two downsides I see to the egg cooker are the fact that you can only do seven eggs at once and I can get a slightly more tender egg when I do them using one of the other methods (in fact, ALL of the other methods) that I've been trying these past four weeks. That being said, the "set it and forget it" mentality certainly makes this device hugely desirable in many peoples' eyes.

Baking Soda In The Water
6 cups of cold tap water
1 teaspoon Arm & Hammer baking soda (sodium bicarbonate)
Time to come to boil: 11 minutes, 35 seconds
Time boiling: 1 min
Time sitting off heat: 11 minutes
Time cooled under cold water: 3 minutes
Baking Soda In The Water group ratings:
* Ease of peeling: 9
* Outer appearance: 9
* Texture: 10
* Taste: 10
The baking soda eggs this week were just shy of being a perfect peel and a perfect appearance. Overall, this method has done quite well, but other than the first week, has never achieved a consistently perfect score. That being said, the technique of adding a level teaspoon of baking soda to six cups of cold water drastically improves (at least when the eggs are fresher) the likelihood of easy-to-peel and easy-on-the-eyes hard-boiled eggs.

Salt In The Water and Egg Pricked
6 cups of cold tap water
2 tablespoons kosher salt (sodium chloride)
Time to come to boil: 11 minutes, 40 seconds
Time boiling: 1 min
Time sitting off heat: 11 minutes
Time cooled under cold water: 3 minutes
Salt In The Water and Egg Pricked group ratings:
* Ease of peeling: 10
* Outer appearance: 10
* Texture: 10
* Taste: 10
Interestingly, the "Salt & Prick" method has proven to be easy to peel from the beginning and nothing has changed this week. For the past three weeks, it has also yielded perfect-appearance eggs as well. This week, while I did give the appearance a 10, there was a notable blemish on one of the eggs; however, after checking the egg shell for signs of cooked egg white and discovering none, I determined that the blemish was caused by the age of the egg, rather than the white being peeled away with the egg shell. While I expected the air gap at the larger end of the egg to grow over time, I hadn't expected other areas of the egg to also show this feature.

So what is the great conclusion to all of this? If you want consistent results without having to worry about how they are cooked or for how long, go out and buy yourself a Cuisinart Egg Cooker. While you may have to tweak the amount of distilled water you add in order to get perfectly peel-able and delectable eggs, in the end, it does take all the guesswork out of the equation. If you don't want to waste $30 and wish to get great results out of the pan you already own, might I suggest the "salt & prick" method? I consulted with my friend and high school science teacher, Amy Waldfogle, who suggested this technique. Upon asking her why this method would work so well, she responded:
"what the salt does is it makes the water you're boiling in hypertonic to the solution in the eggs, which causes some of the water inside the egg membrane to leave - that shrinks the egg a little bit, separating it from the inside of the shell ... same thing that happens when the egg is older - it dehydrates a little"
and
"the inner shell membrane is 'selectively permeable' - that means some things (small molecules, things that are neutral) can pass through but others (big things, things with charges) can't. Salt (sodium chloride) and baking soda (sodium bicarbonate) are ionic compounds that dissociate when they dissolve in water - that means they become a bunch of ions floating around - they won't pass through the membrane"
and as a result
"water will move out of the egg into the pot because the natural order of things (entropy) favors equilibrium - everything having the same concentration - so since water is the only thing involved that can travel across the membrane, the egg will dehydrate"
So why prick the egg, too? In addition to allowing the air pressure to equalize inside and outside the egg (which prevents the egg from cracking during cooking), this also allows water to move into the egg during the cooking process and further separate the membrane from the shell. It's the same reason that the egg cooker (via steam) works so well, if slightly less effective.
So, there you have it. If you don't want to go out and buy yourself a dedicated egg cooker, simply prick the larger end of your eggs and add two tablespoons of kosher salt for every six cups of water in your pot. Interestingly, since the membrane in the egg only allows water to move back and forth, the salt in the water does not make the eggs salty, like it would with cooking pasta. Thus, if concerns about sodium intake are an issue, you can put those aside. In terms of the age of the eggs and how that affected the peeling results, generally, as the got older, they did become easier to peel (the control group at least). The second week was definitely a real pain to peel, and based on the original dozen that gave me such a hard time, I don't think that age is a definite indicator of success.
I hope this experiment has been as fun for you as it has been for me. Here's to many successful, easy-to-peel hard-boiled eggs!
Friday, June 17, 2011
Kitchen Challenge: Hard-Boiled Eggs, Part III
Welcome back to the third week of the grand hard-boiled egg experiment! In the previous two installments, I endeavored to test three experimental egg cooking methods that would yield easily peel-able and beautifully presentable hard-boiled eggs. My control eggs, also known as the way I've been doing it for decades, consists of placing the cold eggs into the pan, filling it with cold water so that it covers the eggs by about an inch or so, bringing them to a boil, boiling them for one minute, then moving the pan to a cool burner and placing the lid on for eleven minutes.
While none of these methods have changed since the last two posts, I was hoping that by this third installment, the control group would be easier to peel because of the age of the eggs (yet another theory I am testing). The theory is that as the eggs get older, the membrane between the shell and the albumen begins to break down. With this breaking down of the membrane, the resulting hard-boiled egg should be easier to peel. How did this week's eggs fare? Let's find out!
As always, we start with the control group:
Control Group
6 cups of cold tap water
Time to come to boil: 11 minutes, 55 seconds
Time boiling: 1 min
Time sitting off heat: 11 minutes
Time cooled under cold water: 3 minutes
Control group ratings:
* Ease of peeling: 6
* Outer appearance: 6
* Texture: 10
* Taste: 10
As an entire group, this week's control was easier to peel, two of them still gave me considerable trouble while the third was a total breeze (easily a 10 on its own). Two of the eggs were potmarked with missing albumen, but the third was perfect. While this was an improvement over last week's control eggs, they still didn't beat the first week's numbers.
Commercial Egg Cooker
Time in the egg cooker: ~16 minutes, 30 seconds
Time cooled under cold water: 3 minutes
Water adjustment: - 1/2 tablespoon
Commercial Egg Cooker ratings:
* Ease of peeling: 10
* Outer appearance: 10
* Texture: 9
* Taste: 10
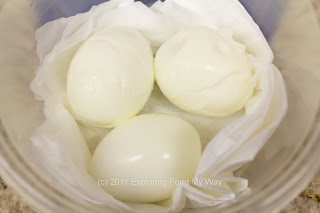
As it has consistently done so far, the Egg Cooker from Cuisinart has produced easily peel-able eggs with a flawless appearance. Clearly this is emerging as the front-runner for those wishing no-fuss peeling and visually perfect eggs. As for the second 9 in a row for texture, the egg is just about perfect, but not quite as ultra-tender as when I cook it using a non-automatic method. We're talking shades of gray here. For most people, it would rate a 10.
Baking Soda In The Water
6 cups of cold tap water
1 teaspoon Arm & Hammer baking soda (sodium bicarbonate)
Time to come to boil: 11 minutes, 45 seconds
Time boiling: 1 min
Time sitting off heat: 11 minutes
Time cooled under cold water: 3 minutes
Baking Soda In The Water group ratings:
* Ease of peeling: 9
* Outer appearance: 9
* Texture: 10
* Taste: 10
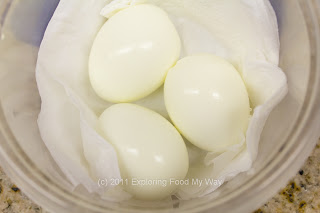
The trick to getting these eggs to peel easily was to get underneath the membrane. Then, the shell separated easily from the albumen. This time around, there were just a few very minor blemishes. Almost a 10, but not quite.

Salt In The Water and Egg Pricked
6 cups of cold tap water
2 tablespoons kosher salt (sodium chloride)
Time to come to boil: 11 minutes, 50 seconds
Time boiling: 1 min
Time sitting off heat: 11 minutes
Time cooled under cold water: 3 minutes
Salt In The Water and Egg Pricked group ratings:
* Ease of peeling: 10
* Outer appearance: 10
* Texture: 10
* Taste: 10
Once again for a second week in a row, the "salt and prick" method comes out with perfectly peel-able and presentable eggs.

The astute among you will notice that the time it took to bring the water to boil (as well as the time it took the egg cooker to complete its cooking cycle) was noticeably less than in previous weeks. While it is certainly possible that the humidity levels and atmospheric pressure changed in my apartment, the more likely culprit is that I bought a room fan to help circulate the air and was able to raise the ambient temperature of my living space by several degrees. I will make sure not to change the thermostat before next week's final installment and see if the "bring-to-boil" times match this week's results.
In terms of overall peeling and presentation ratings, the Cuisinart Egg Cooker continues to excel at its uni-tasker ability. That being said, the "salt and prick" method has now scored a second week of dual 10's and is quickly becoming the favorite non-uni-tasker method for getting consistent easily peeled and flawless hard-boiled eggs. After this week's installment, I could begin to make some generalizations, but I will wait until the final post, next Friday, to enter the results of the final installment of this grand "eggsperiment" and look to draw some conclusions. Until then, happy egg peeling!
While none of these methods have changed since the last two posts, I was hoping that by this third installment, the control group would be easier to peel because of the age of the eggs (yet another theory I am testing). The theory is that as the eggs get older, the membrane between the shell and the albumen begins to break down. With this breaking down of the membrane, the resulting hard-boiled egg should be easier to peel. How did this week's eggs fare? Let's find out!
As always, we start with the control group:
Control Group
6 cups of cold tap water
Time to come to boil: 11 minutes, 55 seconds
Time boiling: 1 min
Time sitting off heat: 11 minutes
Time cooled under cold water: 3 minutes
Control group ratings:
* Ease of peeling: 6
* Outer appearance: 6
* Texture: 10
* Taste: 10
As an entire group, this week's control was easier to peel, two of them still gave me considerable trouble while the third was a total breeze (easily a 10 on its own). Two of the eggs were potmarked with missing albumen, but the third was perfect. While this was an improvement over last week's control eggs, they still didn't beat the first week's numbers.

Commercial Egg Cooker
Time in the egg cooker: ~16 minutes, 30 seconds
Time cooled under cold water: 3 minutes
Water adjustment: - 1/2 tablespoon
Commercial Egg Cooker ratings:
* Ease of peeling: 10
* Outer appearance: 10
* Texture: 9
* Taste: 10
As it has consistently done so far, the Egg Cooker from Cuisinart has produced easily peel-able eggs with a flawless appearance. Clearly this is emerging as the front-runner for those wishing no-fuss peeling and visually perfect eggs. As for the second 9 in a row for texture, the egg is just about perfect, but not quite as ultra-tender as when I cook it using a non-automatic method. We're talking shades of gray here. For most people, it would rate a 10.

Baking Soda In The Water
6 cups of cold tap water
1 teaspoon Arm & Hammer baking soda (sodium bicarbonate)
Time to come to boil: 11 minutes, 45 seconds
Time boiling: 1 min
Time sitting off heat: 11 minutes
Time cooled under cold water: 3 minutes
Baking Soda In The Water group ratings:
* Ease of peeling: 9
* Outer appearance: 9
* Texture: 10
* Taste: 10
The trick to getting these eggs to peel easily was to get underneath the membrane. Then, the shell separated easily from the albumen. This time around, there were just a few very minor blemishes. Almost a 10, but not quite.

Salt In The Water and Egg Pricked
6 cups of cold tap water
2 tablespoons kosher salt (sodium chloride)
Time to come to boil: 11 minutes, 50 seconds
Time boiling: 1 min
Time sitting off heat: 11 minutes
Time cooled under cold water: 3 minutes
Salt In The Water and Egg Pricked group ratings:
* Ease of peeling: 10
* Outer appearance: 10
* Texture: 10
* Taste: 10
Once again for a second week in a row, the "salt and prick" method comes out with perfectly peel-able and presentable eggs.

The astute among you will notice that the time it took to bring the water to boil (as well as the time it took the egg cooker to complete its cooking cycle) was noticeably less than in previous weeks. While it is certainly possible that the humidity levels and atmospheric pressure changed in my apartment, the more likely culprit is that I bought a room fan to help circulate the air and was able to raise the ambient temperature of my living space by several degrees. I will make sure not to change the thermostat before next week's final installment and see if the "bring-to-boil" times match this week's results.
In terms of overall peeling and presentation ratings, the Cuisinart Egg Cooker continues to excel at its uni-tasker ability. That being said, the "salt and prick" method has now scored a second week of dual 10's and is quickly becoming the favorite non-uni-tasker method for getting consistent easily peeled and flawless hard-boiled eggs. After this week's installment, I could begin to make some generalizations, but I will wait until the final post, next Friday, to enter the results of the final installment of this grand "eggsperiment" and look to draw some conclusions. Until then, happy egg peeling!
Wednesday, June 15, 2011
What Makes Eddie's Famous Cheesesteaks Famous?
It's rare that I visit a restaurant on opening day. It's even rarer that you read about it later that same day.
From the moment it was announced in the weekly food section of the Akron Beacon Journal about a month ago, something about Eddie's Famous Cheesesteaks has simply grabbed hold of my attention and refused to let it go. Was this a national chain? It kind of felt like it but initial research indicated otherwise. The Facebook page for the restaurant was filled with endless mono-thematic rants of, "Cheesesteaks, baby!" and a gratuitous over-use of the exclamation point. To top it off, even though the original ABJ article written by Lisa Abraham stated that the restaurant was supposed to open on May 24th, in actuality, because of delays in getting various permits and certifications, it didn't open until today, Wednesday, June 15th at noon. And I only discovered that since I periodically checked the Facebook page for updates.
Eddie's Famous Cheesesteaks was located at 1375 North Portage Path, Akron, OH 44313 and can be reached at 330-864-8500 (this was a different number than was listed on their Facebook fan page). There was ample parking around the small group of businesses clustered together. Here was a shot of the front entrance to Eddie's:

What you don't really see to the left of the above shot was the painter's scaffolding that was still up. If it wasn't for the balloons with the "Welcome!" message on them, I might have thought they still weren't open. Once inside, I was surprised to discover that I was the first actual paying customer (not of the day, mind you, but like, ever) and I was warmly greeted by about six people. While service today felt a little "rough," since this was their opening day, I didn't take any service blips into account (employees were still learning the cash register, soda fountain, etc.). Those things should gradually ameliorate themselves over the next couple of weeks.
While there were wall menus hanging above the service line, I wasn't able to get a picture of them with my rather conspicuous camera, so I resorted to grabbing one of the printed menus at the cash register and photographing it at my table instead:


I liked the composition of the menu. It felt focused and yet had enough variety to appeal to a crowd not interested only in beef and dairy offerings. What I didn't care for on the menu was the lack of attention to grammar, punctuation, and spelling. For instance, under the "Our Story" section at the bottom in the above photograph:
"Welcome to Eddies Famous Cheesesteaks & Grille! We started at festivals and street fairs across the U.S. -- in Panama City Beach something happened. Eddie met a cat ironically also names Eddie. What happened the next three years is truly what legends are made of: Eddies created cheesesteaks beyond real. The "Eddie", a pound and a half of cheesesteak love took Eddies to a new level of fanatic admiration on the beaches of Panama! Cheesesteak Eddie, as the PCB cat came to be known, convinced Eddie that it was time to open a full time joint. Eddie's is fresh stuff right off the griddle -- before your eyes and made-to-order. Our soon to be legendary fries with our cheesesteak heaven are amazing. Crossed the country to find the bomb fries, found them on a boardwalk in Maryland, and "WOW", we found French Fry Nirvana! Ours are close but we one upped 'em and added the gourmet French Fry Bar! Lots of other good eats to choose from -- all made with the highest quality, freshest ingredients. Think of it as your festival faves, taken up a notch. We threw in kick butt salads with housemade dressings to make sure you know were serious about our food. Eddie thinks you'll love this joint and come back often -- See ya soon!"
Now look, gentle reader, I realize that I have made plenty of spelling and grammatical mistakes over the course of the last two and a half years of writing this blog; I don't claim to be perfect. However, to my eyes, I count numerous punctuation, grammar, and spelling errors in the above copy. This is on your menu, for goodness sake! A blog can be easily corrected; five thousand copies of your menu have to be reprinted once the corrections are made. [Ed. Note: My high school senior composition teacher, Ms. Rohrer, probably would have had a stroke reading that paragraph.]
Okay, so enough with the English lessons. How was the food? After ordering and paying for my lunch, I took my French Fries and glass of water and retired to one of many tables lining the dining room area. Shortly afterward, my cheesesteak joined the party. Here was a shot of my lunch after I had applied some of the regular ketchup from the "gourmet French Fry Bar":
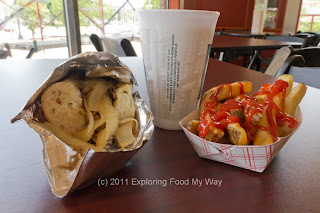
Incidentally, the gourmet French Fry Bar was six or seven sauces inside translucent plastic bottles sitting on one of the islands in the dining room. Today I was here for the standard meal, so I choose plain, ordinary ketchup for my fries. Perhaps next time I will be more adventurous and try one of the other sauces.
Just as I was about to sit, a man walked over to me and introduced himself as Ed Sutter, owner and general manager of Eddie's. He asked my name (which I dutifully provided) and thanked me for being the first customer. I thought about revealing my true reason for coming in, but decided since he hadn't asked and since I wanted to try and enjoy my lunch instead of talking all the way through it trying to explain what I do on this blog, I allowed the conversation to end quickly.
First, I started up with my half sandwich, the "Original":

I don't know whether this was a conscientious decision on Ed Sutter's part or not, but nowhere had he ever claimed that he was offering a Philadelphia or "Philly" style cheesesteak. That is an important distinction because many outside of Philadelphia have claimed it and nearly all of them have failed. Miserably. The only two I've come across in my travels that have been nearly as good or as good have been Cosmo's Cheesesteaks in Scranton, PA and Original Steaks & Hoagies in Twinsburg, OH.
The "original" comes with grilled meat, sauteed onions and mushrooms, and Provolone and Mozzarella cheese. The meat, lying under the bed of cooked onions, was tender and seasoned well. The onions and mushrooms were cooked nicely, soft, but not mushy. My only criticism of the onions was that they were a bit unwieldy; had they been chopped more finely and integrated into the meat, they wouldn't have been falling out with each bite. The blend of cheeses was noticeable visually, but not so much in the taste. It wasn't that the sandwich lacked salt, more like it lacked punch. Perhaps using a sharp Provolone would've made this sandwich stand out more.
Finally, the roll. Believe it or not, the roll on a cheesesteak sandwich, Philly-style or not, is as important as the ingredients it carries within. Most versions of this sandwich I've had in northeast Ohio haven't held up to the juiciness of the meat, sogging out and falling apart mid-bite. To Eddie's credit, the steamed buns, while completely soft, actually held up during the entire consumption of the sandwich. A true Philly cheesesteak would've been served on a roll (such as the ones made by the Amoroso Bakery) that had both a nice chewy exterior while maintaining a soft interior. But, as I said before, Eddie's wasn't advertising an authentic Philly cheesesteak. Overall, as a steak sandwich, it worked. The full size was a foot long, but I was completely happy with my half today for lunch.
I next turned my attention to the boardwalk-style fresh-cut fries:

Fresh-cut fries have generally meant thin, limp, oily masses of fried potatoes. Some people love this style of fry. I, as has been stated numerous times before, do not. I was surprised to discover that I actually liked Eddie's fries. They were thick cut and for the most part, properly fried. Seasoned correctly even without the ketchup, I am guessing I could have enjoyed them plain. I did find a fry or two at the bottom of the container that was a touch greasy and undercooked, but this was mostly a successful side dish.
In the end, I was pleasantly surprised by my lunch today at Eddie's Famous Cheesesteaks. I think it definitely takes some chutzpah to open a restaurant in an area where you aren't known and claim that you are "famous" for offering a food item for which there are plenty of purists around, ready to dispute your version. Essentially, if you are looking for a "whiz wit" or a "mushroom Provolone witout," Eddie's is not for you. Find your way up to Original Steaks & Hoagies in Twinsburg for that. However, if you are looking for an overall decent cheesesteak and pretty darn good boardwalk-style fresh-cut fries, Eddie's may just be the place where you can get your fix.
Now if they could just get a menu printed that didn't require the use of a red pen.

From the moment it was announced in the weekly food section of the Akron Beacon Journal about a month ago, something about Eddie's Famous Cheesesteaks has simply grabbed hold of my attention and refused to let it go. Was this a national chain? It kind of felt like it but initial research indicated otherwise. The Facebook page for the restaurant was filled with endless mono-thematic rants of, "Cheesesteaks, baby!" and a gratuitous over-use of the exclamation point. To top it off, even though the original ABJ article written by Lisa Abraham stated that the restaurant was supposed to open on May 24th, in actuality, because of delays in getting various permits and certifications, it didn't open until today, Wednesday, June 15th at noon. And I only discovered that since I periodically checked the Facebook page for updates.
Eddie's Famous Cheesesteaks was located at 1375 North Portage Path, Akron, OH 44313 and can be reached at 330-864-8500 (this was a different number than was listed on their Facebook fan page). There was ample parking around the small group of businesses clustered together. Here was a shot of the front entrance to Eddie's:

What you don't really see to the left of the above shot was the painter's scaffolding that was still up. If it wasn't for the balloons with the "Welcome!" message on them, I might have thought they still weren't open. Once inside, I was surprised to discover that I was the first actual paying customer (not of the day, mind you, but like, ever) and I was warmly greeted by about six people. While service today felt a little "rough," since this was their opening day, I didn't take any service blips into account (employees were still learning the cash register, soda fountain, etc.). Those things should gradually ameliorate themselves over the next couple of weeks.
While there were wall menus hanging above the service line, I wasn't able to get a picture of them with my rather conspicuous camera, so I resorted to grabbing one of the printed menus at the cash register and photographing it at my table instead:


I liked the composition of the menu. It felt focused and yet had enough variety to appeal to a crowd not interested only in beef and dairy offerings. What I didn't care for on the menu was the lack of attention to grammar, punctuation, and spelling. For instance, under the "Our Story" section at the bottom in the above photograph:
"Welcome to Eddies Famous Cheesesteaks & Grille! We started at festivals and street fairs across the U.S. -- in Panama City Beach something happened. Eddie met a cat ironically also names Eddie. What happened the next three years is truly what legends are made of: Eddies created cheesesteaks beyond real. The "Eddie", a pound and a half of cheesesteak love took Eddies to a new level of fanatic admiration on the beaches of Panama! Cheesesteak Eddie, as the PCB cat came to be known, convinced Eddie that it was time to open a full time joint. Eddie's is fresh stuff right off the griddle -- before your eyes and made-to-order. Our soon to be legendary fries with our cheesesteak heaven are amazing. Crossed the country to find the bomb fries, found them on a boardwalk in Maryland, and "WOW", we found French Fry Nirvana! Ours are close but we one upped 'em and added the gourmet French Fry Bar! Lots of other good eats to choose from -- all made with the highest quality, freshest ingredients. Think of it as your festival faves, taken up a notch. We threw in kick butt salads with housemade dressings to make sure you know were serious about our food. Eddie thinks you'll love this joint and come back often -- See ya soon!"
Now look, gentle reader, I realize that I have made plenty of spelling and grammatical mistakes over the course of the last two and a half years of writing this blog; I don't claim to be perfect. However, to my eyes, I count numerous punctuation, grammar, and spelling errors in the above copy. This is on your menu, for goodness sake! A blog can be easily corrected; five thousand copies of your menu have to be reprinted once the corrections are made. [Ed. Note: My high school senior composition teacher, Ms. Rohrer, probably would have had a stroke reading that paragraph.]
Okay, so enough with the English lessons. How was the food? After ordering and paying for my lunch, I took my French Fries and glass of water and retired to one of many tables lining the dining room area. Shortly afterward, my cheesesteak joined the party. Here was a shot of my lunch after I had applied some of the regular ketchup from the "gourmet French Fry Bar":

Incidentally, the gourmet French Fry Bar was six or seven sauces inside translucent plastic bottles sitting on one of the islands in the dining room. Today I was here for the standard meal, so I choose plain, ordinary ketchup for my fries. Perhaps next time I will be more adventurous and try one of the other sauces.
Just as I was about to sit, a man walked over to me and introduced himself as Ed Sutter, owner and general manager of Eddie's. He asked my name (which I dutifully provided) and thanked me for being the first customer. I thought about revealing my true reason for coming in, but decided since he hadn't asked and since I wanted to try and enjoy my lunch instead of talking all the way through it trying to explain what I do on this blog, I allowed the conversation to end quickly.
First, I started up with my half sandwich, the "Original":

I don't know whether this was a conscientious decision on Ed Sutter's part or not, but nowhere had he ever claimed that he was offering a Philadelphia or "Philly" style cheesesteak. That is an important distinction because many outside of Philadelphia have claimed it and nearly all of them have failed. Miserably. The only two I've come across in my travels that have been nearly as good or as good have been Cosmo's Cheesesteaks in Scranton, PA and Original Steaks & Hoagies in Twinsburg, OH.
The "original" comes with grilled meat, sauteed onions and mushrooms, and Provolone and Mozzarella cheese. The meat, lying under the bed of cooked onions, was tender and seasoned well. The onions and mushrooms were cooked nicely, soft, but not mushy. My only criticism of the onions was that they were a bit unwieldy; had they been chopped more finely and integrated into the meat, they wouldn't have been falling out with each bite. The blend of cheeses was noticeable visually, but not so much in the taste. It wasn't that the sandwich lacked salt, more like it lacked punch. Perhaps using a sharp Provolone would've made this sandwich stand out more.
Finally, the roll. Believe it or not, the roll on a cheesesteak sandwich, Philly-style or not, is as important as the ingredients it carries within. Most versions of this sandwich I've had in northeast Ohio haven't held up to the juiciness of the meat, sogging out and falling apart mid-bite. To Eddie's credit, the steamed buns, while completely soft, actually held up during the entire consumption of the sandwich. A true Philly cheesesteak would've been served on a roll (such as the ones made by the Amoroso Bakery) that had both a nice chewy exterior while maintaining a soft interior. But, as I said before, Eddie's wasn't advertising an authentic Philly cheesesteak. Overall, as a steak sandwich, it worked. The full size was a foot long, but I was completely happy with my half today for lunch.
I next turned my attention to the boardwalk-style fresh-cut fries:

Fresh-cut fries have generally meant thin, limp, oily masses of fried potatoes. Some people love this style of fry. I, as has been stated numerous times before, do not. I was surprised to discover that I actually liked Eddie's fries. They were thick cut and for the most part, properly fried. Seasoned correctly even without the ketchup, I am guessing I could have enjoyed them plain. I did find a fry or two at the bottom of the container that was a touch greasy and undercooked, but this was mostly a successful side dish.
In the end, I was pleasantly surprised by my lunch today at Eddie's Famous Cheesesteaks. I think it definitely takes some chutzpah to open a restaurant in an area where you aren't known and claim that you are "famous" for offering a food item for which there are plenty of purists around, ready to dispute your version. Essentially, if you are looking for a "whiz wit" or a "mushroom Provolone witout," Eddie's is not for you. Find your way up to Original Steaks & Hoagies in Twinsburg for that. However, if you are looking for an overall decent cheesesteak and pretty darn good boardwalk-style fresh-cut fries, Eddie's may just be the place where you can get your fix.
Now if they could just get a menu printed that didn't require the use of a red pen.
Subscribe to:
Posts (Atom)
